How investing in smart color LED lights changed my life
The best review and guide for Philips Hue lights. Are Philips Hue bulbs worth the money? How can you get the most out of them? We dive into all that and more.
I love light. I always have. To me, there's not much better than sitting and relaxing in a well lit room – ok, so that's a slight exaggeration, but the point remains, I'd much rather be in a well lit room than a dark one. My wife, Mandy, on the other hand prefers darkness or rather, less light. As you can imagine this resulted in one of us consistently having to make some kind of lighting compromise (it was usually me), which, after a while becomes frustrating.
Something had to change.
My first experience with colored LED lights happened when Mandy and I went over to a couple friend of our's place (Hi Kaley and DJ!) to hang out. It was the first time I experienced what Kaley and DJ called "party lights," within a home environment and to top it off, they were able to control the lights via Alexa--which let me tell you, is game changing (I'll talk more about that later).
The second experience occurred at another couple friend of our's place (Hi Alissa and Pete!). Alissa and Pete had invested in a few Philips Hue Colored LED lights, I watched on as they pulled up the app on their phones to control each light's individual color.
I believe it was later that same night, when Mandy and I got home from Alissa and Pete's, that I placed my initial order for Philips Hue Color LED lights and since then, my life changed.
I'm going to do something bold here–attempt to coin a new phrase: Light palette.
Before we go any further, let me define what a light palette is: A light palette is a preset list of colors for each light in a room.
I know what you're thinking – stop – stop thinking it. "Jeff, why do I need lights that can be 16 million different colors when my regular, old, white lights work?" I'm just going to pretend you didn't think that.
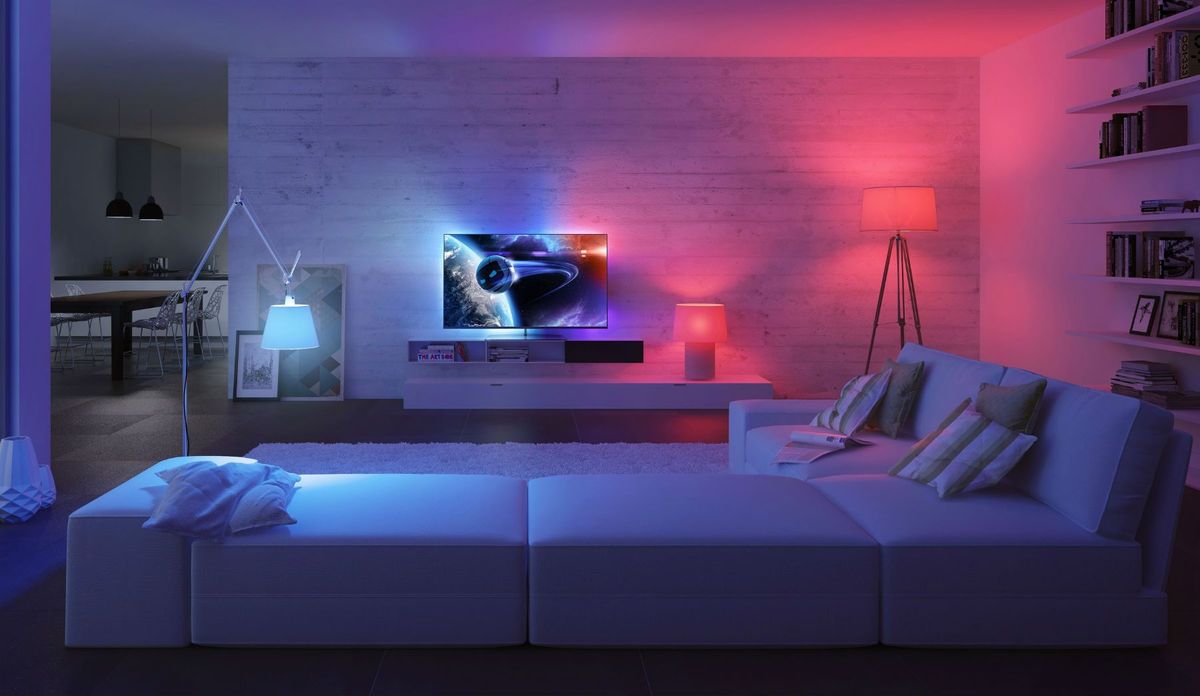
The beautiful thing about installing color LED lights is that you can transform a room in ways you never thought possible. You can set your lights to maximize your energy and productivity or you can set your lights to match your mood or even the time of day.
We're currently living in a time where we're spending more time at home, it makes sense to invest in making your home or your room a more fun and appealing place to live. Over the course of your life you naturally want to make things your own. Everyone does it. From putting posters up on the walls of your childhood bedroom to choosing furniture for your home, it all reflects who we are at that time. Now, take that idea and apply it to the lighting in your home. Shouldn't your home lighting also reflect who you are and how you feel at the time? I say yes, it should.
Everything you need to create a light palette
Perhaps the most beautiful thing about creating a light palette is just how easy it is once you have these things.
- [Ideally] an entire room or a dedicated space within a room.
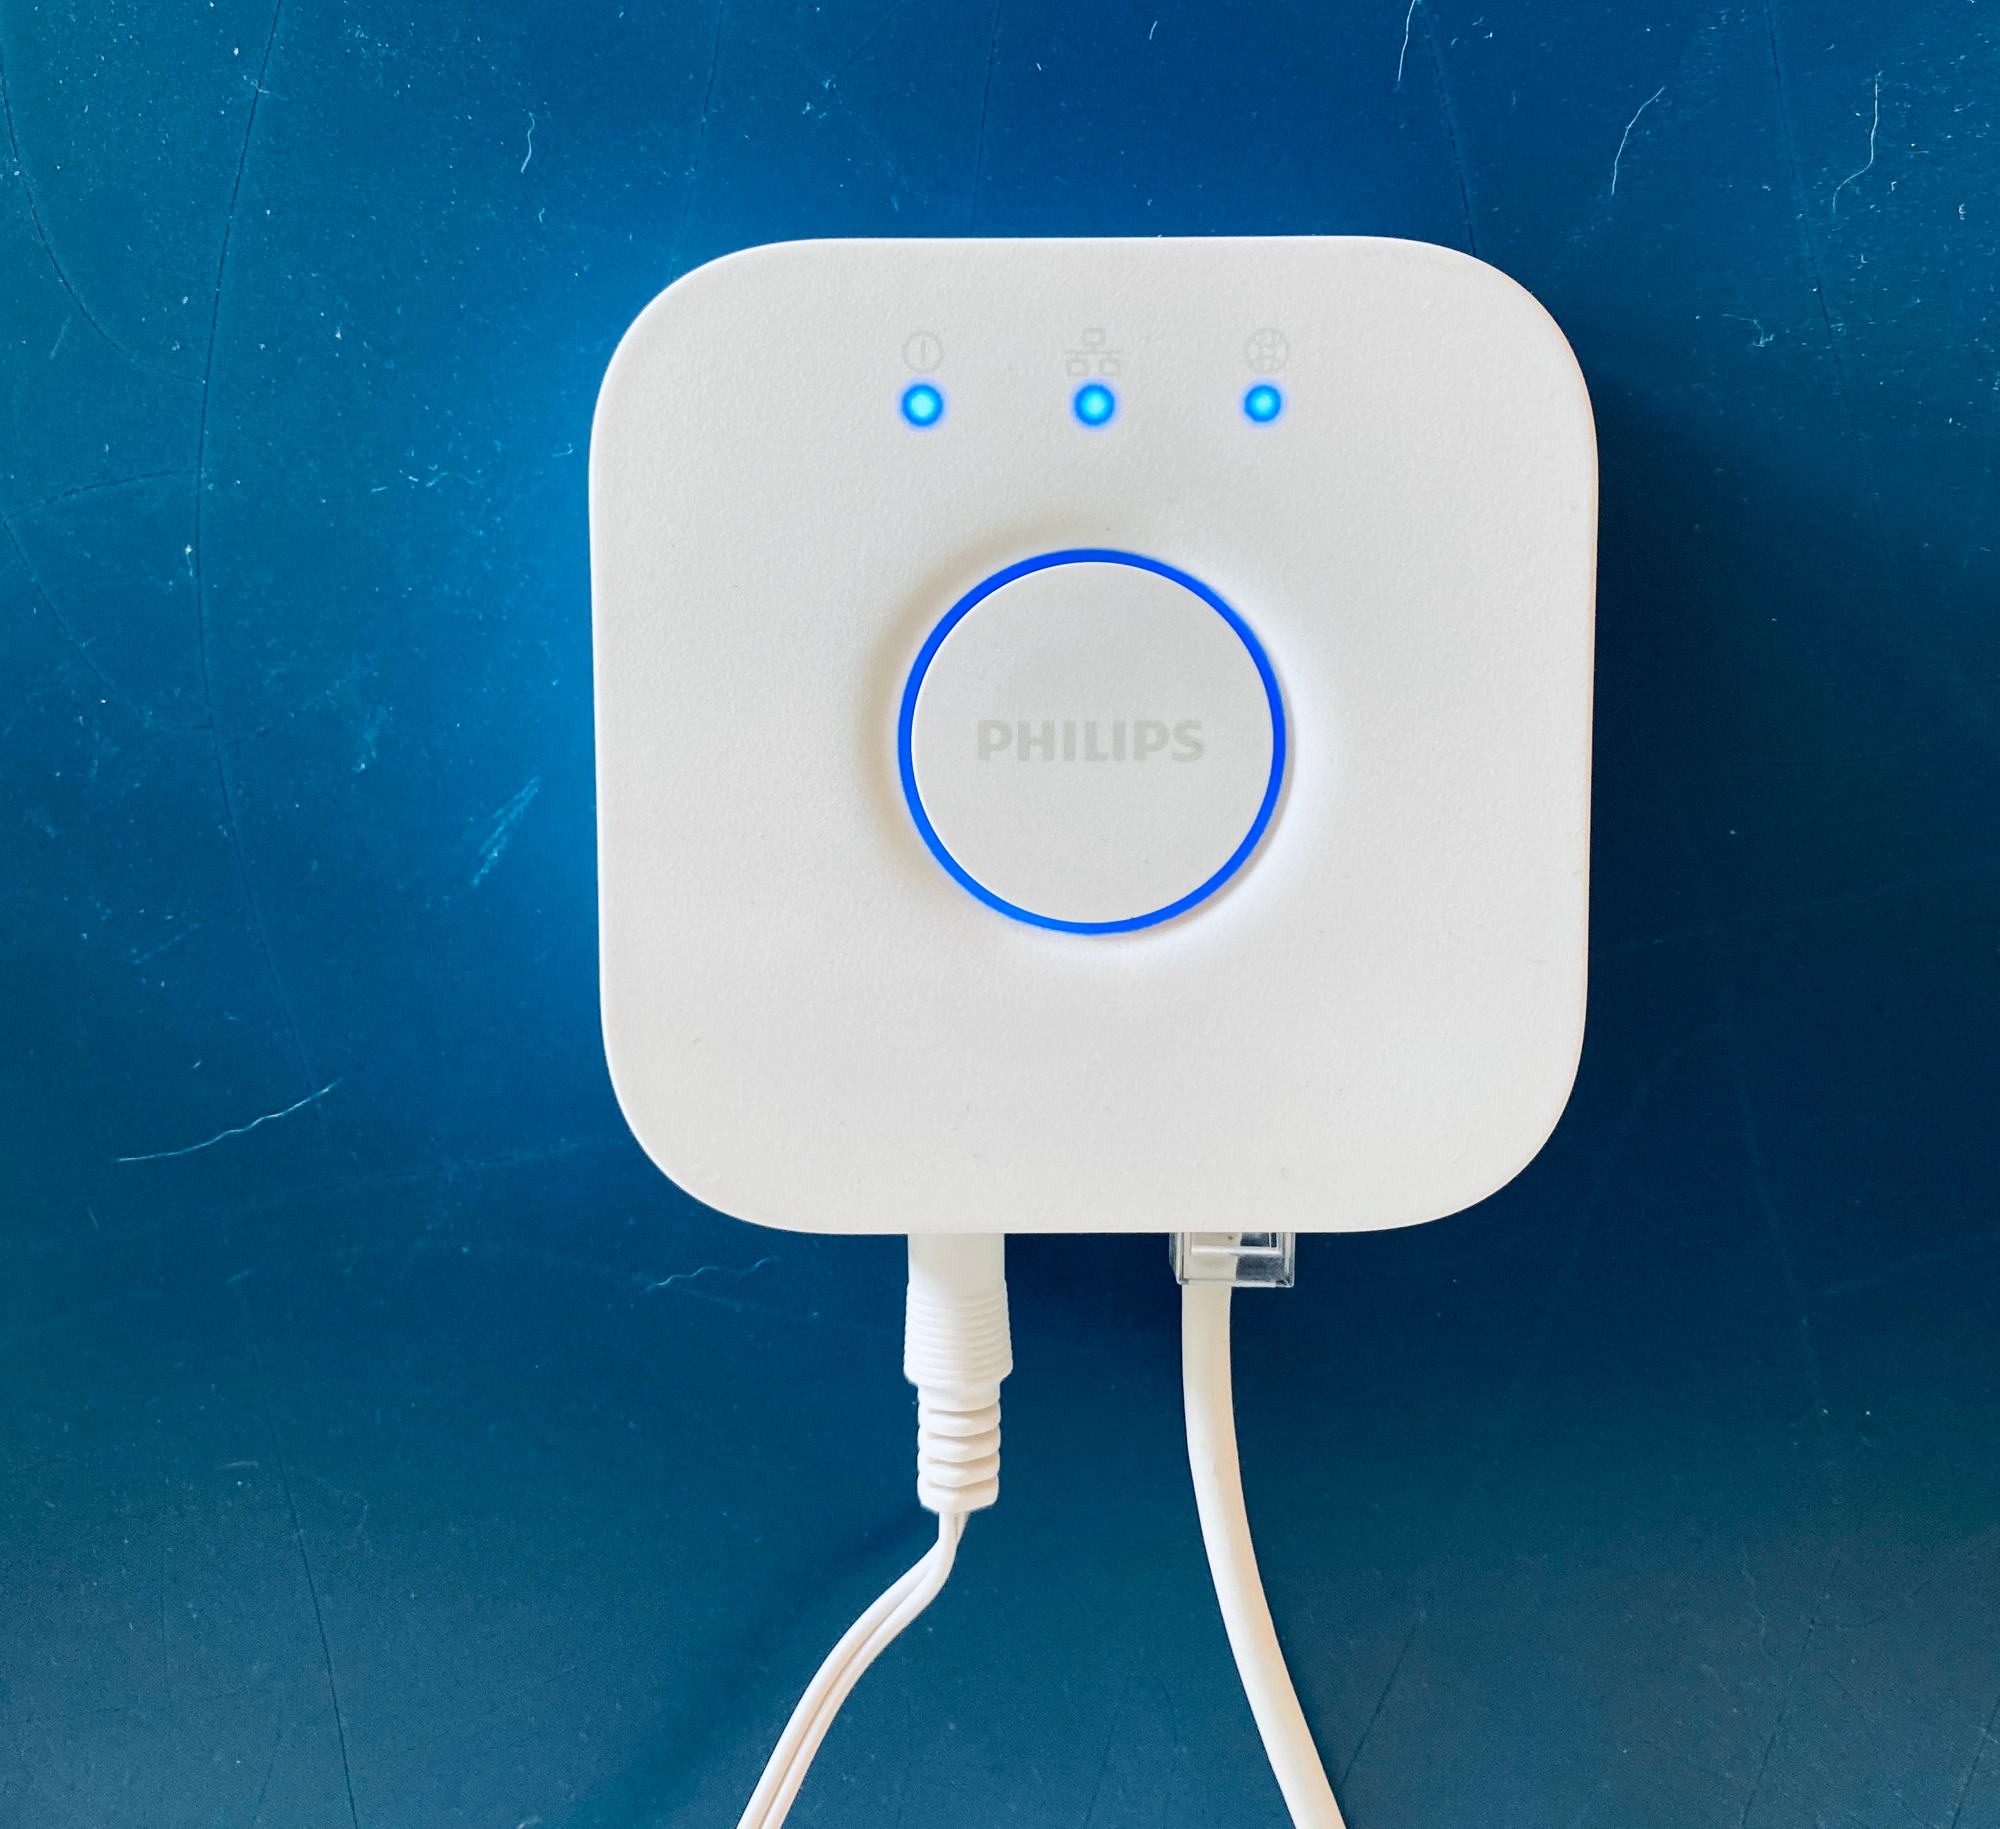
- A Philips Hue starter kit -- you need to start with the starter kit because it includes the bridge device which connects to your router.
- Additional Philips Hue lights as necessary. They also make Philips Hue lights for recessed lighting as well.
- The Philips Hue app.
Installing the Philips Hue lights
Once you have your Philips Hue lights in-hand, you're about to brighten your day. Excuse my terrible pun. The first thing you need to do is connect the bridge device to your router. The bridge device, which ships in the starter kit, is a small white square box that you need to plug into a power outlet as well as your router via an ethernet cable (included). The bridge does not need to be in the same room as where you're installing the actual lights.
When I first decided to purchase these lights, Mandy and I were still living in Brooklyn in a one bedroom apartment. We decided to replace all of the lights in our living room area with Philips Hue color LED lights. That meant we had to replace seven lights. Six of the lights would be installed in our two light trees (each tree has three lights) and the seventh light we replaced was the light in the floor lamp directly above our couch. Our thought at the time was if we're going to do this, we might as well go all out. Turns out, it was definitely a bright idea. Hah, I did it again! Sorry.
Anyway, with the bridge device connected to your network, the next step is to install the Philips Hue lights within your light fixtures. I'll spare you (and myself the typing) of explaining how to install a light bulb. Once the lights are installed, you will want to download the Philips Hue app and press the circular button on the bridge device. This will start the pairing process, simply follow the prompts within the app on your smartphone/tablet.
If all goes well, you should now be able to control your lights via the app as well as your voice (if you want). One of my favorite things to do upon walking into my office is to say, "Hey Siri, turn on the lights," (you can also use Alexa or Google Assistant) and the all of my lights magically turn on. I feel like I live in the future. Hell, I guess I am living in the future. It's nice here – you should join me.
Controlling the Philips Hue lights
Prior to installing the Philips Hue lights I would have to manually turn each light in both light trees on and off. That's six lights to be switched on and off, every day, sometimes multiple times per day. Plus, flipping one light switch for the floor lamp. I can't help but think back during that time of my life and think: I was like a caveman living in the dark ages. Never again.
Now that you have your room and lights configured within the Philips Hue app, you should see your room(s) listed on the main screen of the app when you open it. From the Home screen of the app you can add additional lights, rooms (when you get even more lights--and trust me, you will definitely want to), and even accessories (such as the Hue Sync box – side note: I really want to review one of these).
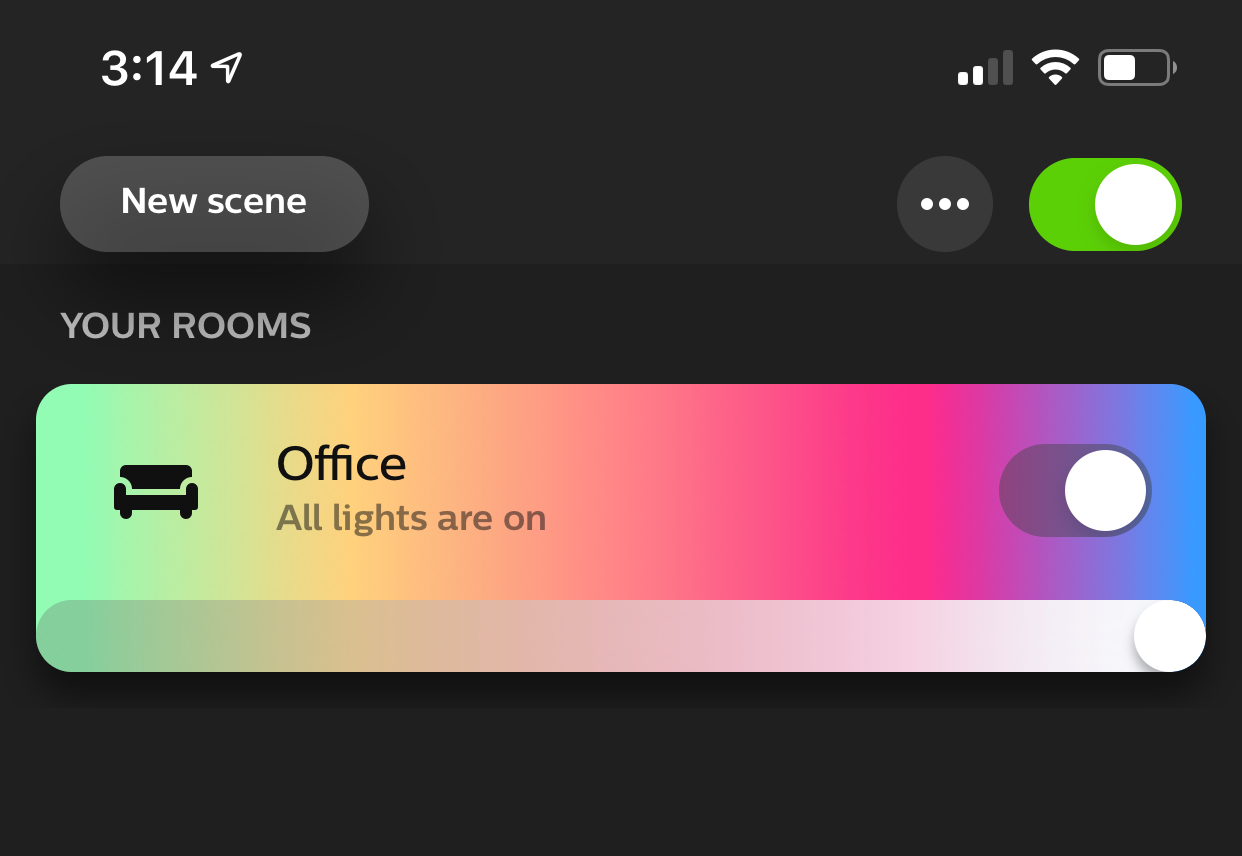
One of the best things about Philips Hue lights is the fact they can all be individually controlled via the app. This means you can easily adjust each individual light's brightness, color, and whether it's on or off straight from the app. In addition to being able to control each light individually you can group lights together by room (e.g. see how I have a room called "Office") allowing you to easily adjust the entire room's brightness, light color either individually or via different scenes (more on scenes later), as well as easily turn on and off all the lights.
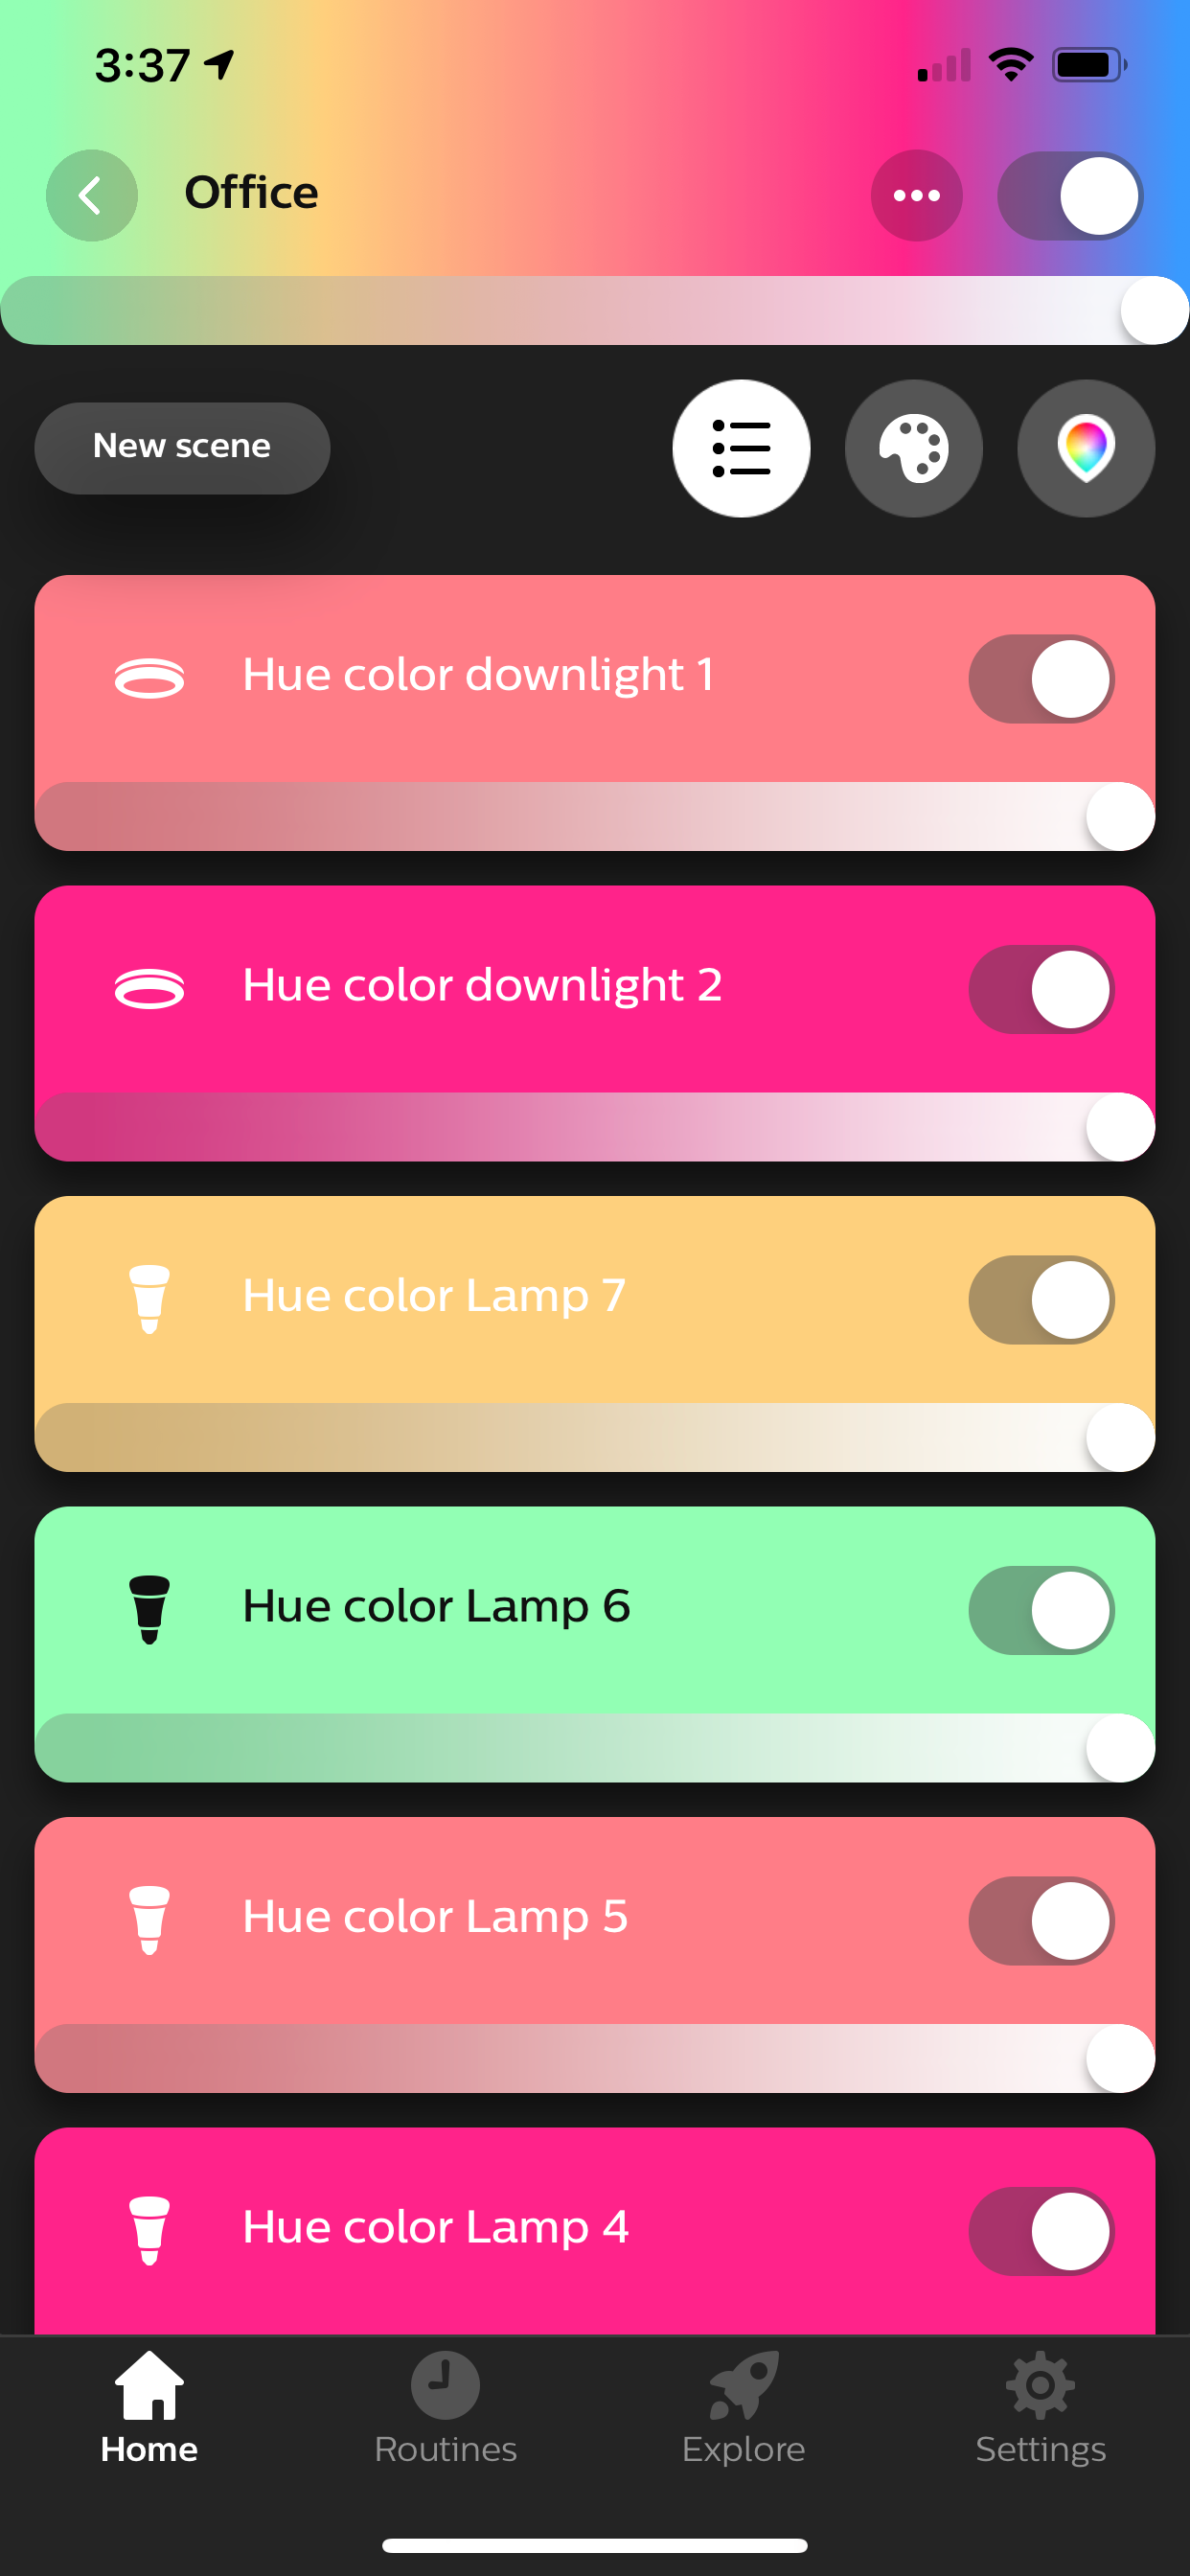
In addition to being able to control whether a single light is on or off as well as the brightness for each light, you can also customize each light's color manually. When viewing the lights in a particular room via the app, tap on the multi-color tear drop-shaped icon on top right of the app. This will bring up a color palette where you can manually adjust the color of each light. I've found this functionality to be more difficult to use than allowing the lights to automatically pull colors from a particular scene. The reason being because it's hard to precisely move the lights around the color palette, which can make it tricky to pin point the exact color you're looking for. It would be really cool if you could input a specific hex code–a feature I'd love to see added.
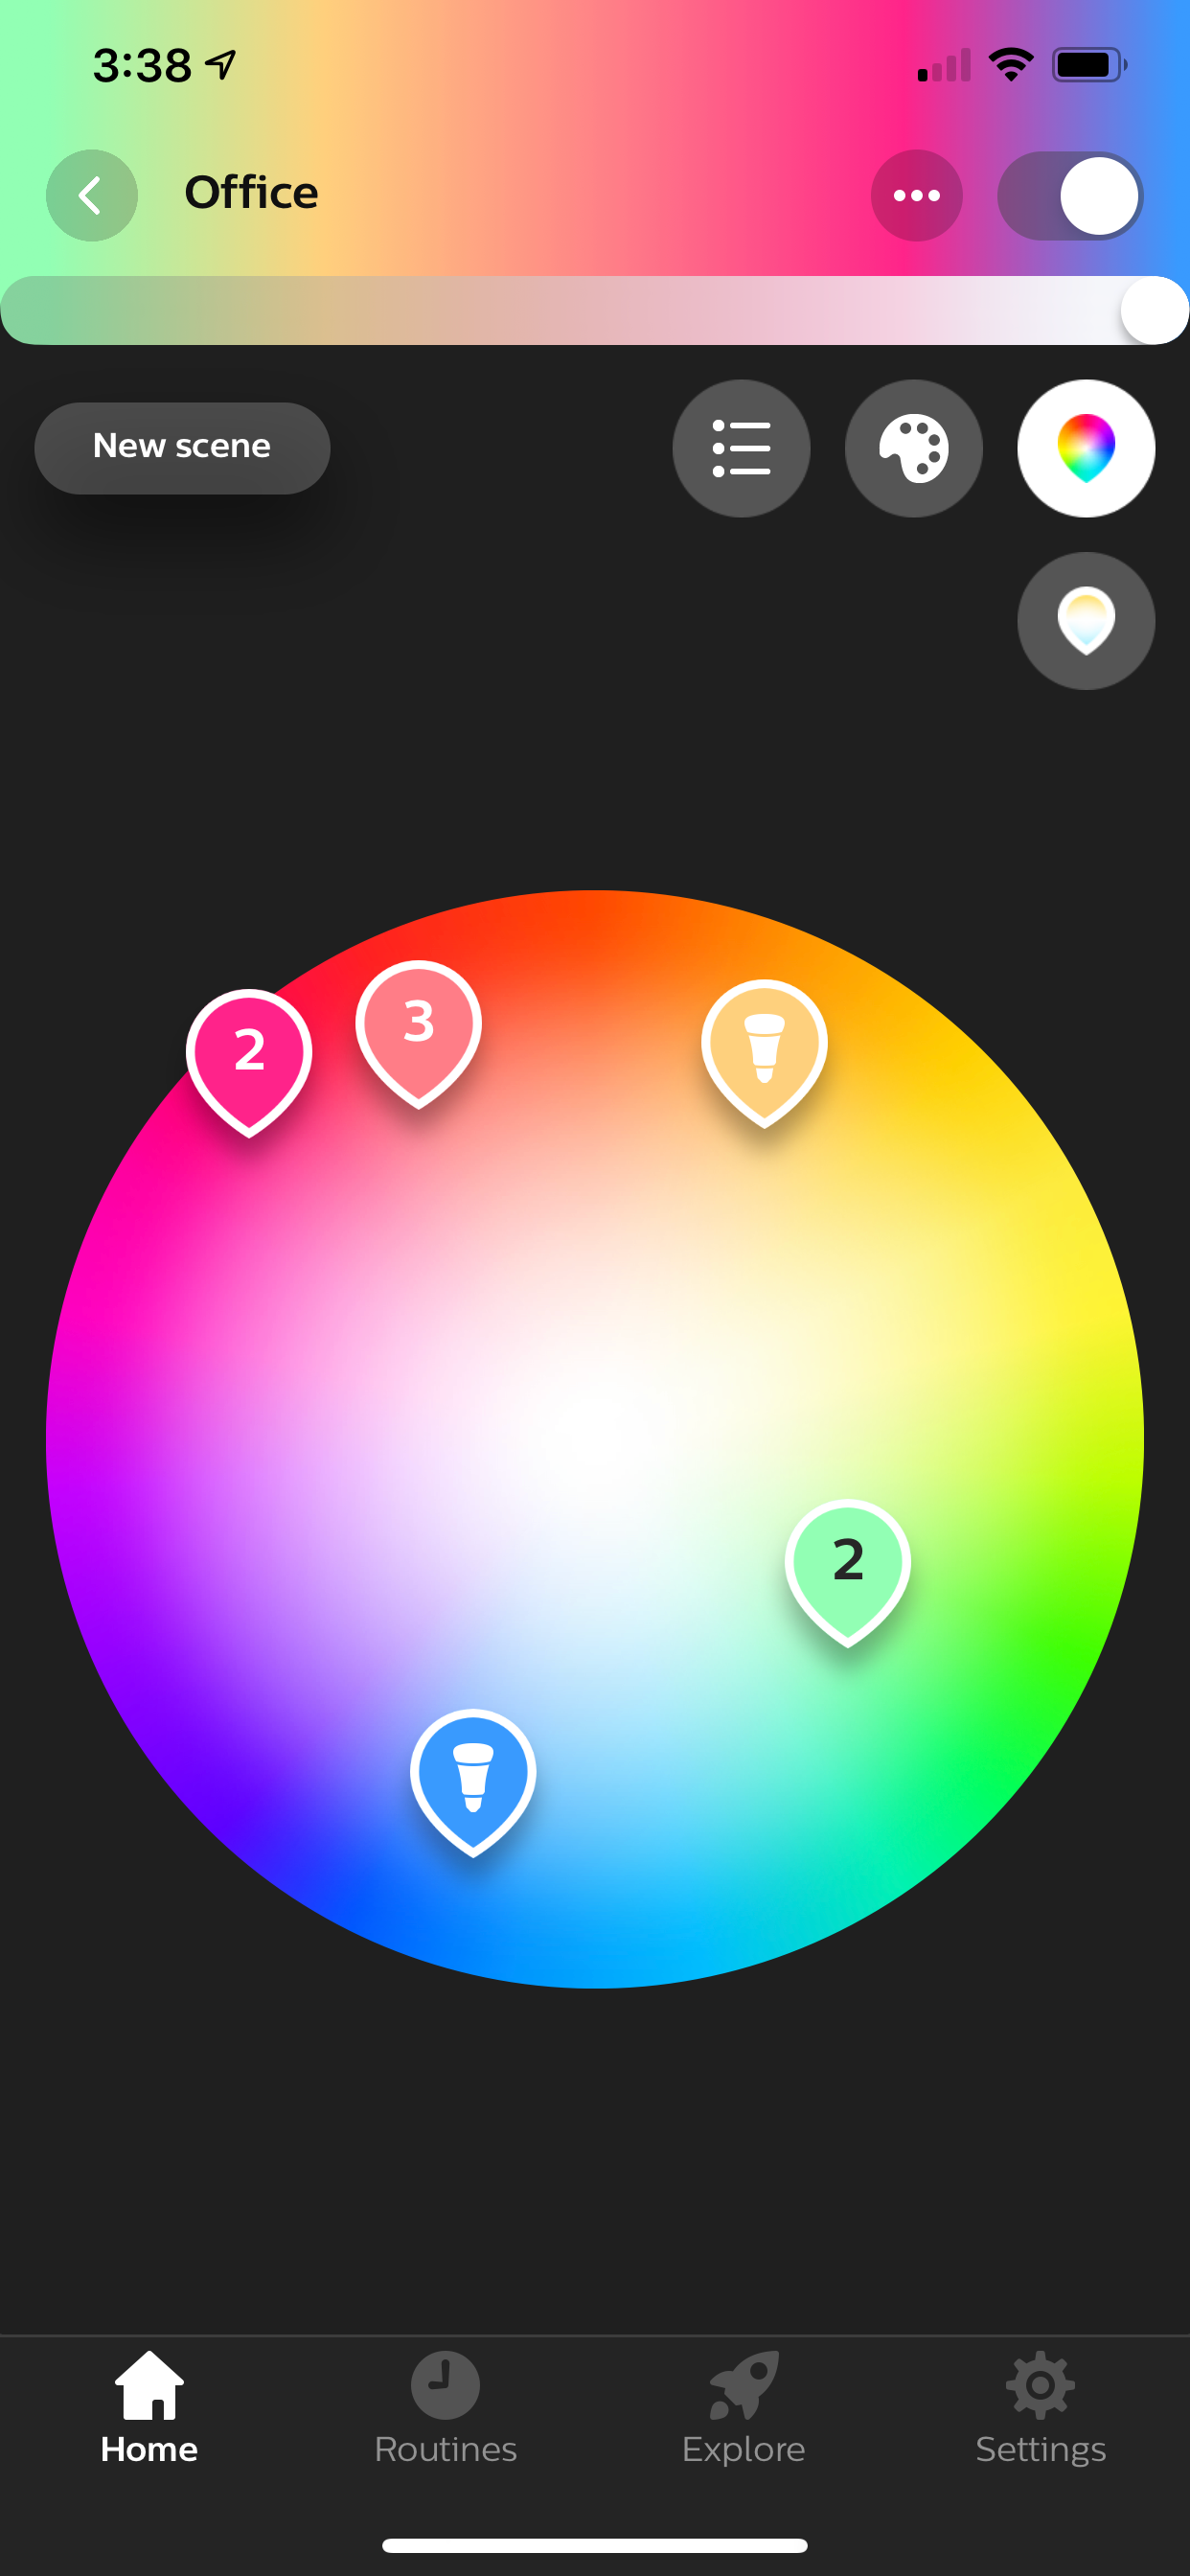
Perhaps what's even more wonderful is that each room you add into the app has the same exact controls. You can set the lights one way in your office and another in your living room.
Setting the scene with Philips Hue lights
When it comes selecting the colors for each of your lights, the easiest and more efficient way to do this is by creating or using existing "Scenes" as the Philips Hue app calls them. I prefer "Light palette," but to each their own.
So, how do you create or use existing scenes/light palettes? It's extremely easy.
In the Philips hue app, tap on the "New scene" button on the top left. Now you will see a similar color palette screen as shown as above, don't touch anything there, instead you will want to tap the camera icon located towards the bottom-middle on the far left. This is where things get really cool. Philips has included a number of really excellent scenes right out of the box. In fact, for a long time I relied on the default scenes (with some slight modifications) because I really enjoyed them.
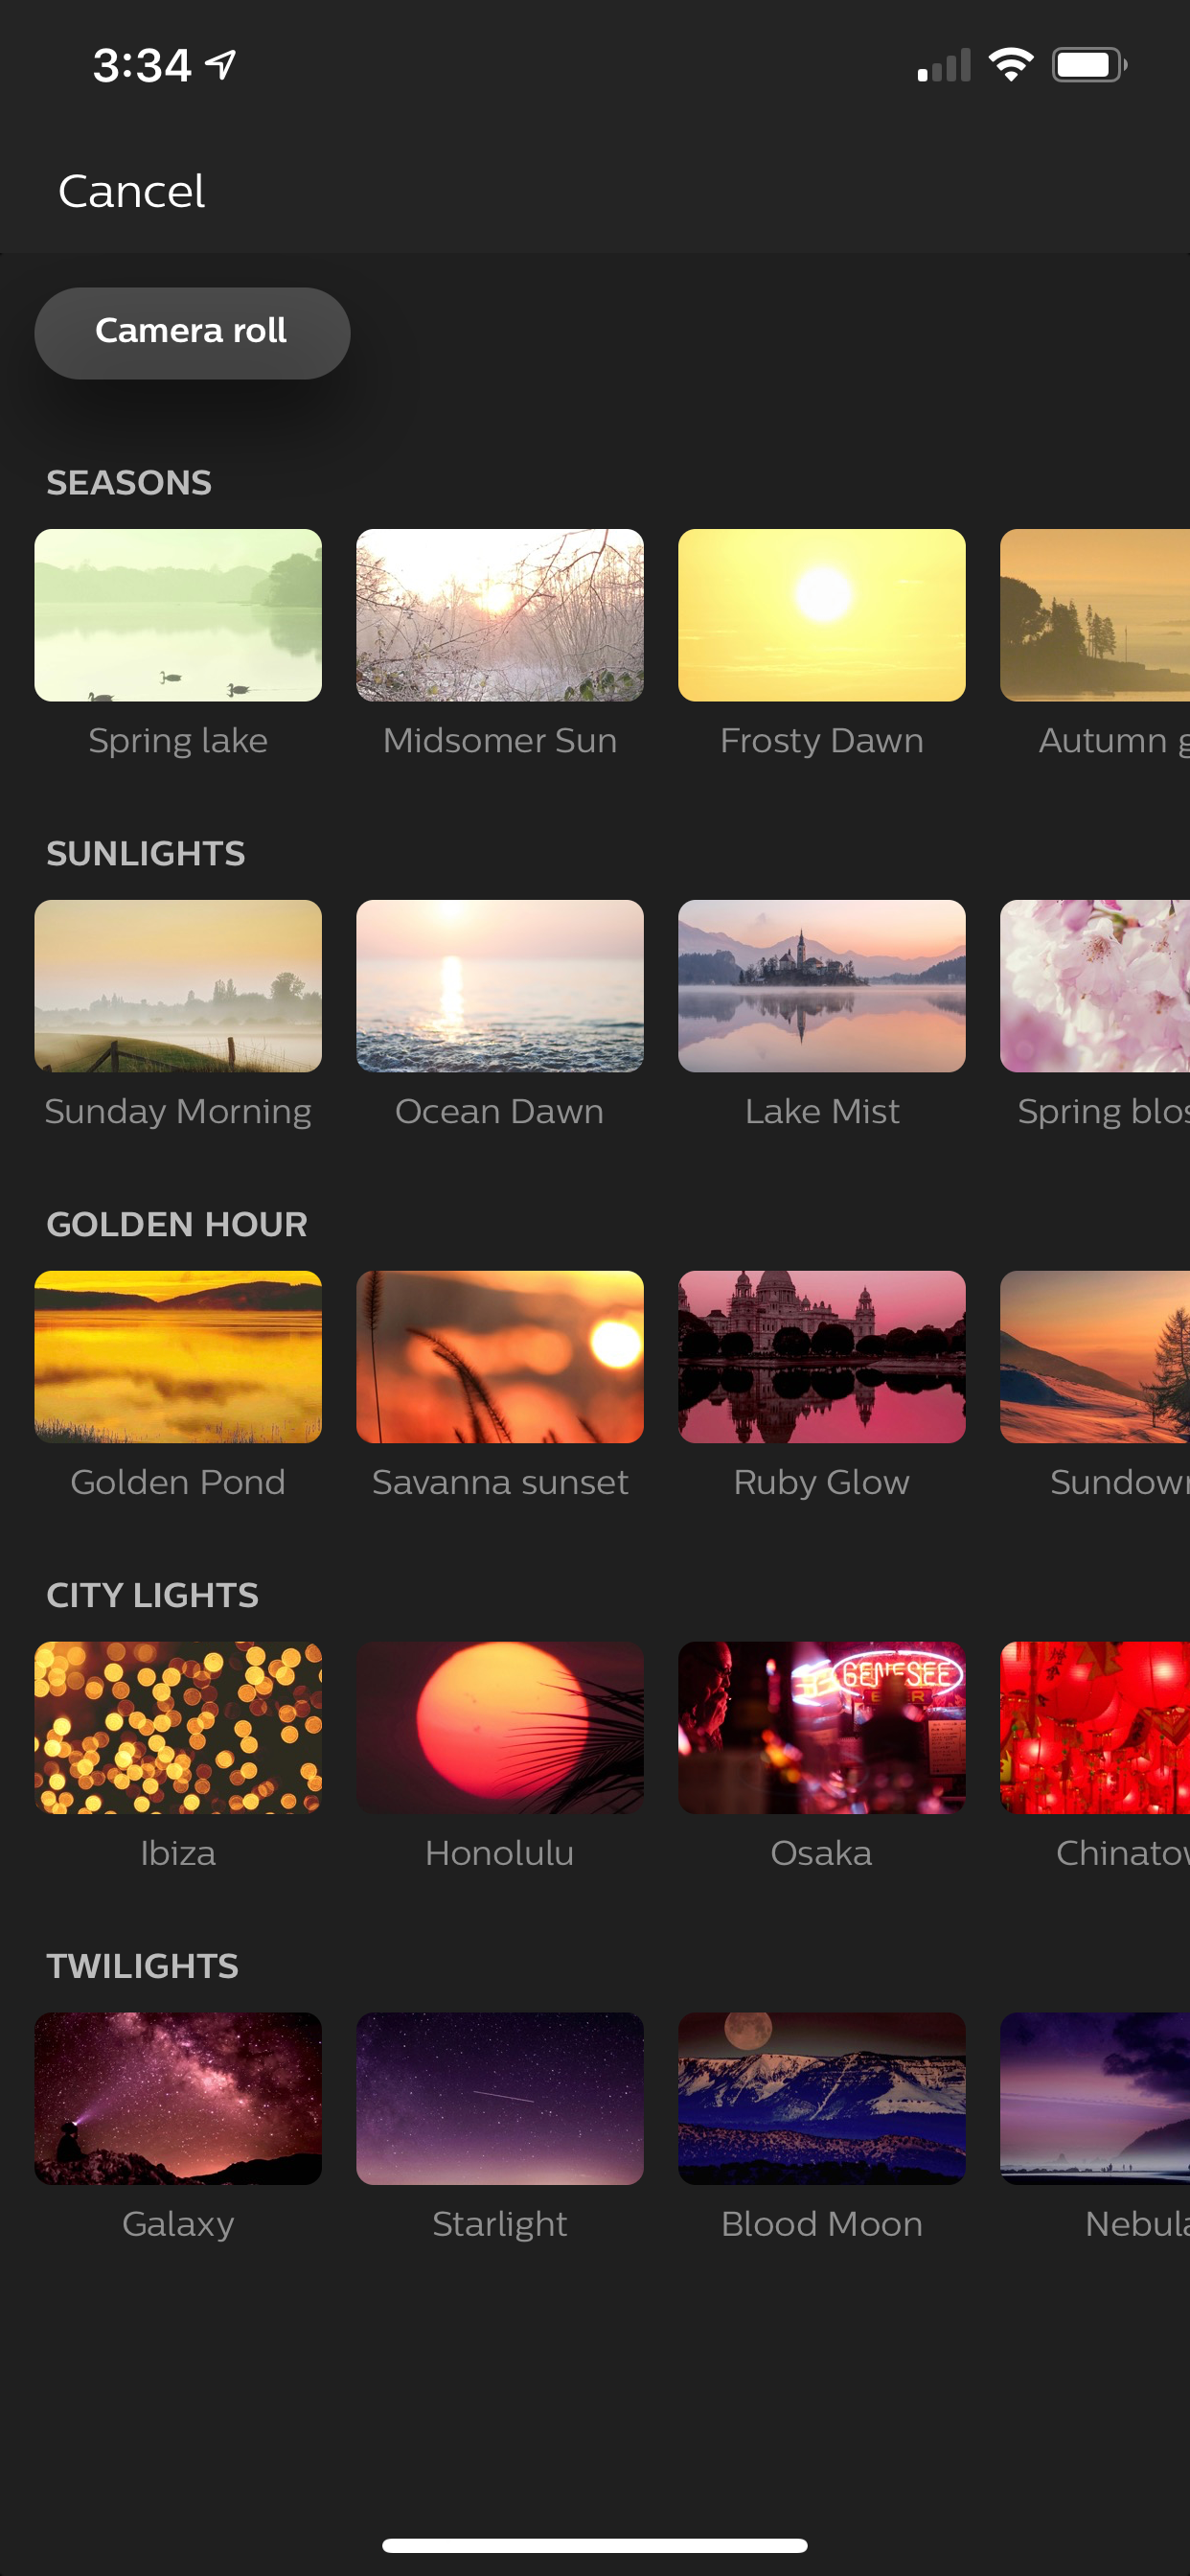
Some of my favorites include Savanna sunset, Spring blossom, Soho, Tokyo, Palm Beach, Chinatown, and Arctic aurora.
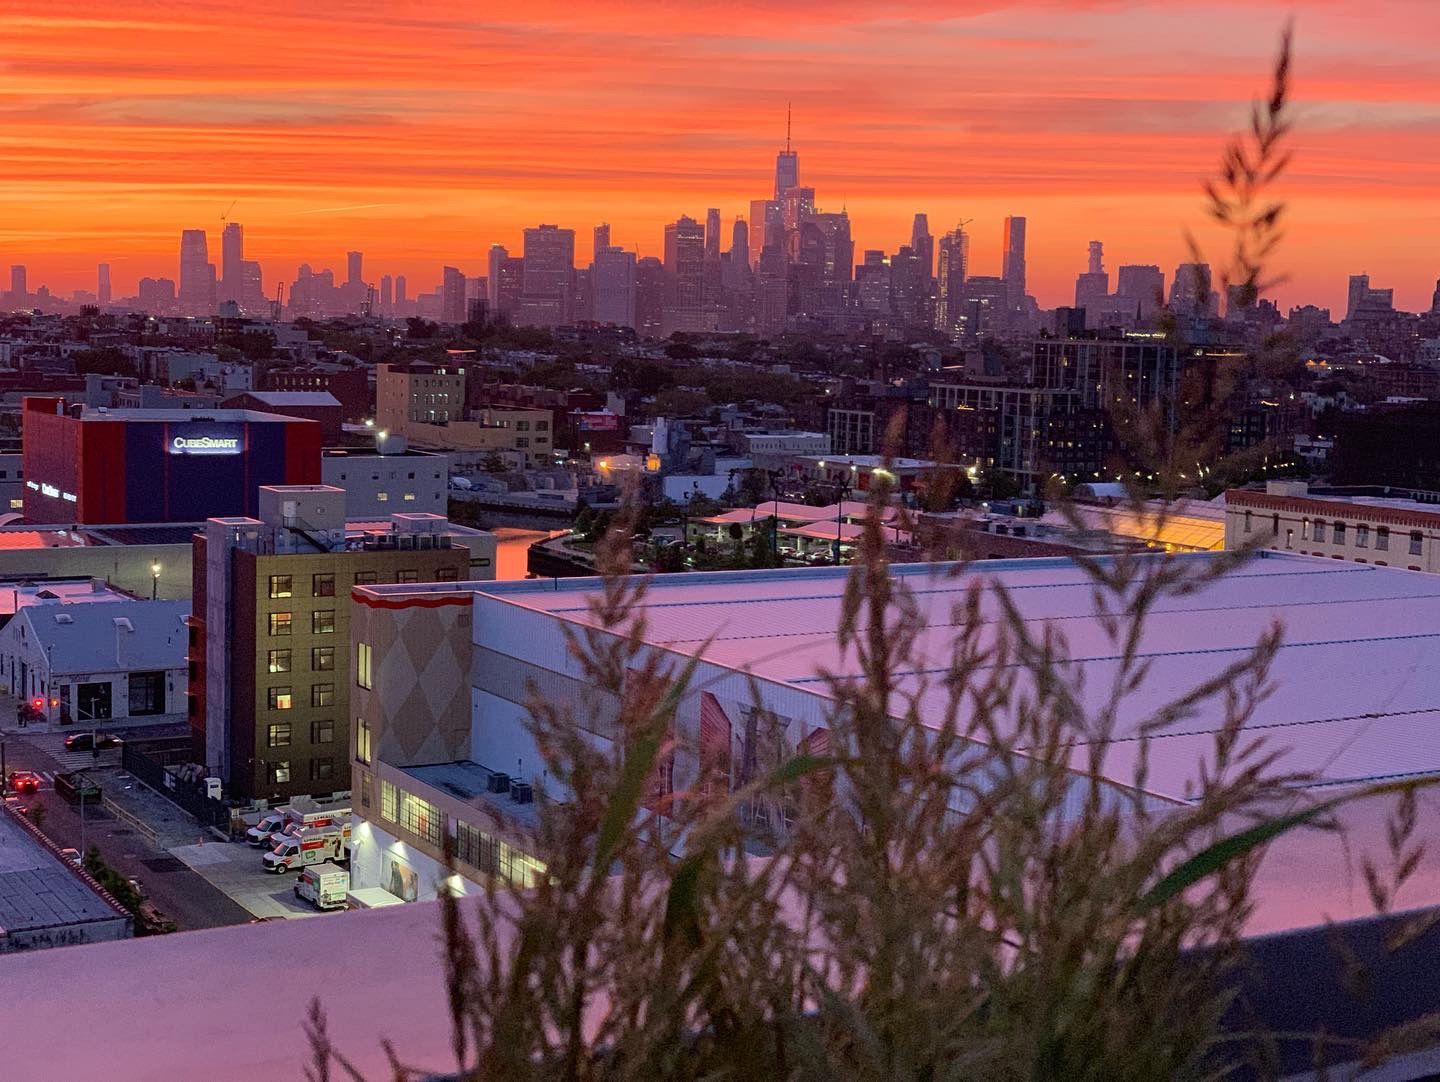
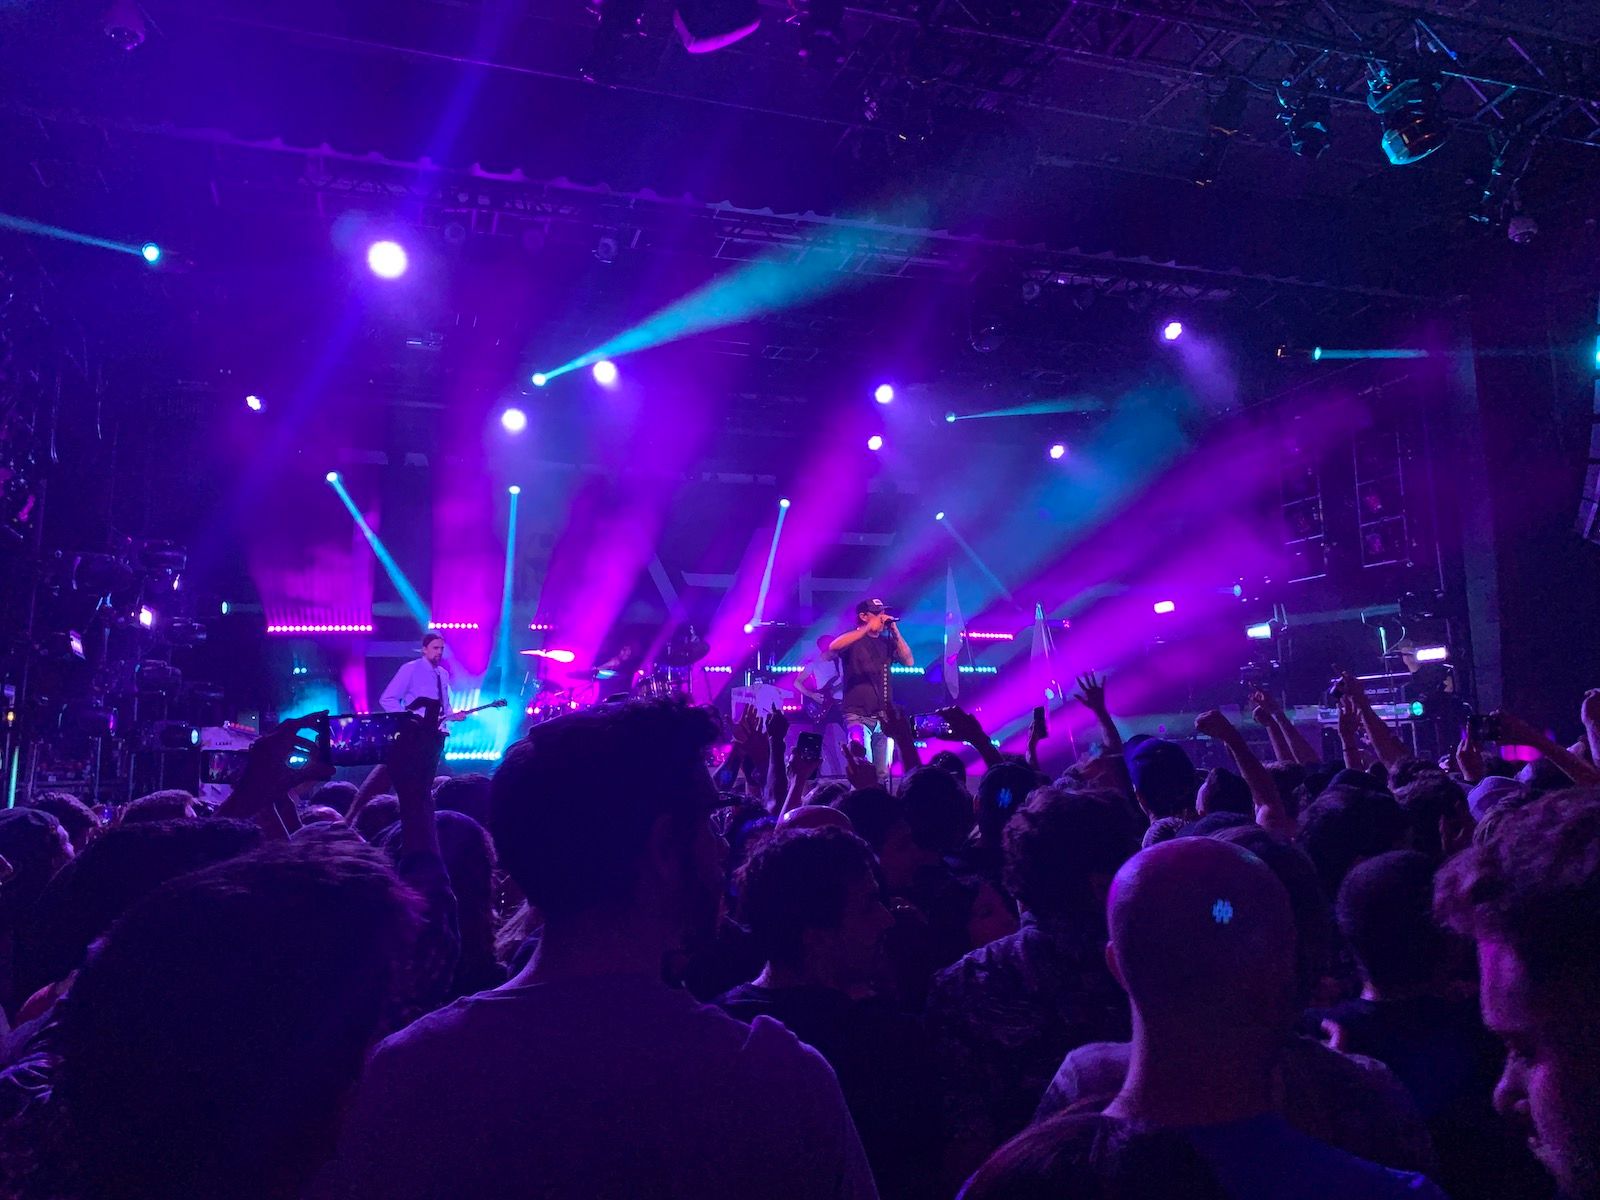
But the real magic starts when you tap the Camera roll button on the top left. Once you do that, you can browse through your own camera roll for photos to import and use as the basis for your light palette/scene. You can even move the imported photo around to have the lights adjust colors depending on which elements of the photo are being focused on. It's very, very cool. Below are four photos I recently used to create some light palettes. Feel free to use them on your own to do the same – but definitely experiment and explore with your own photos as well.


You'll want to experiment with Hue Labs
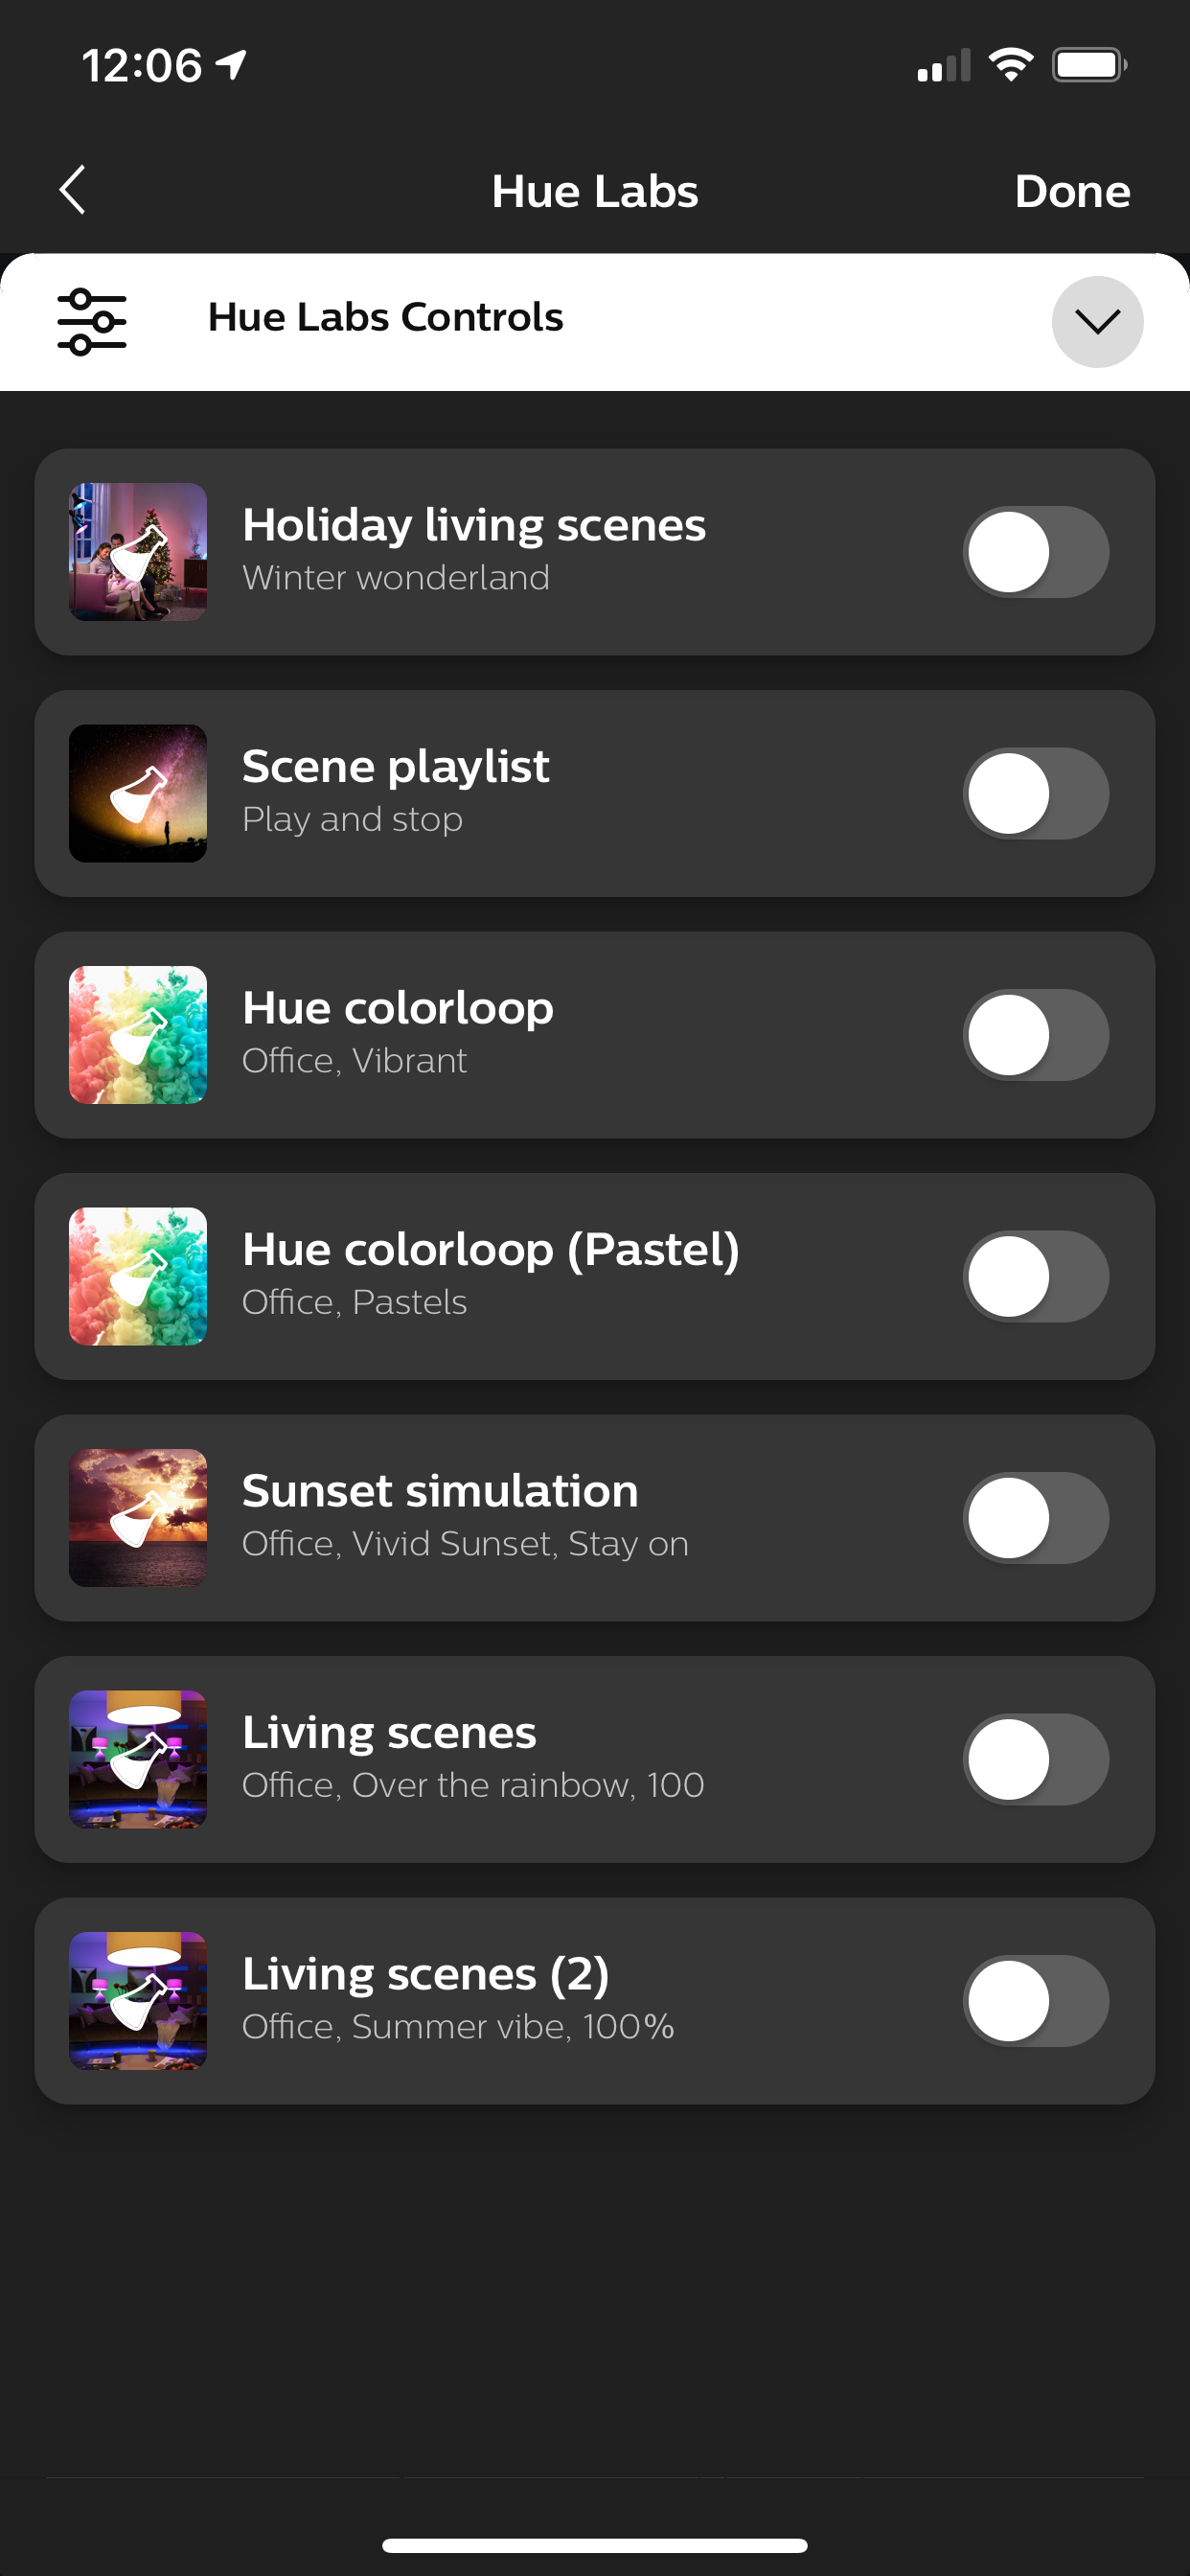
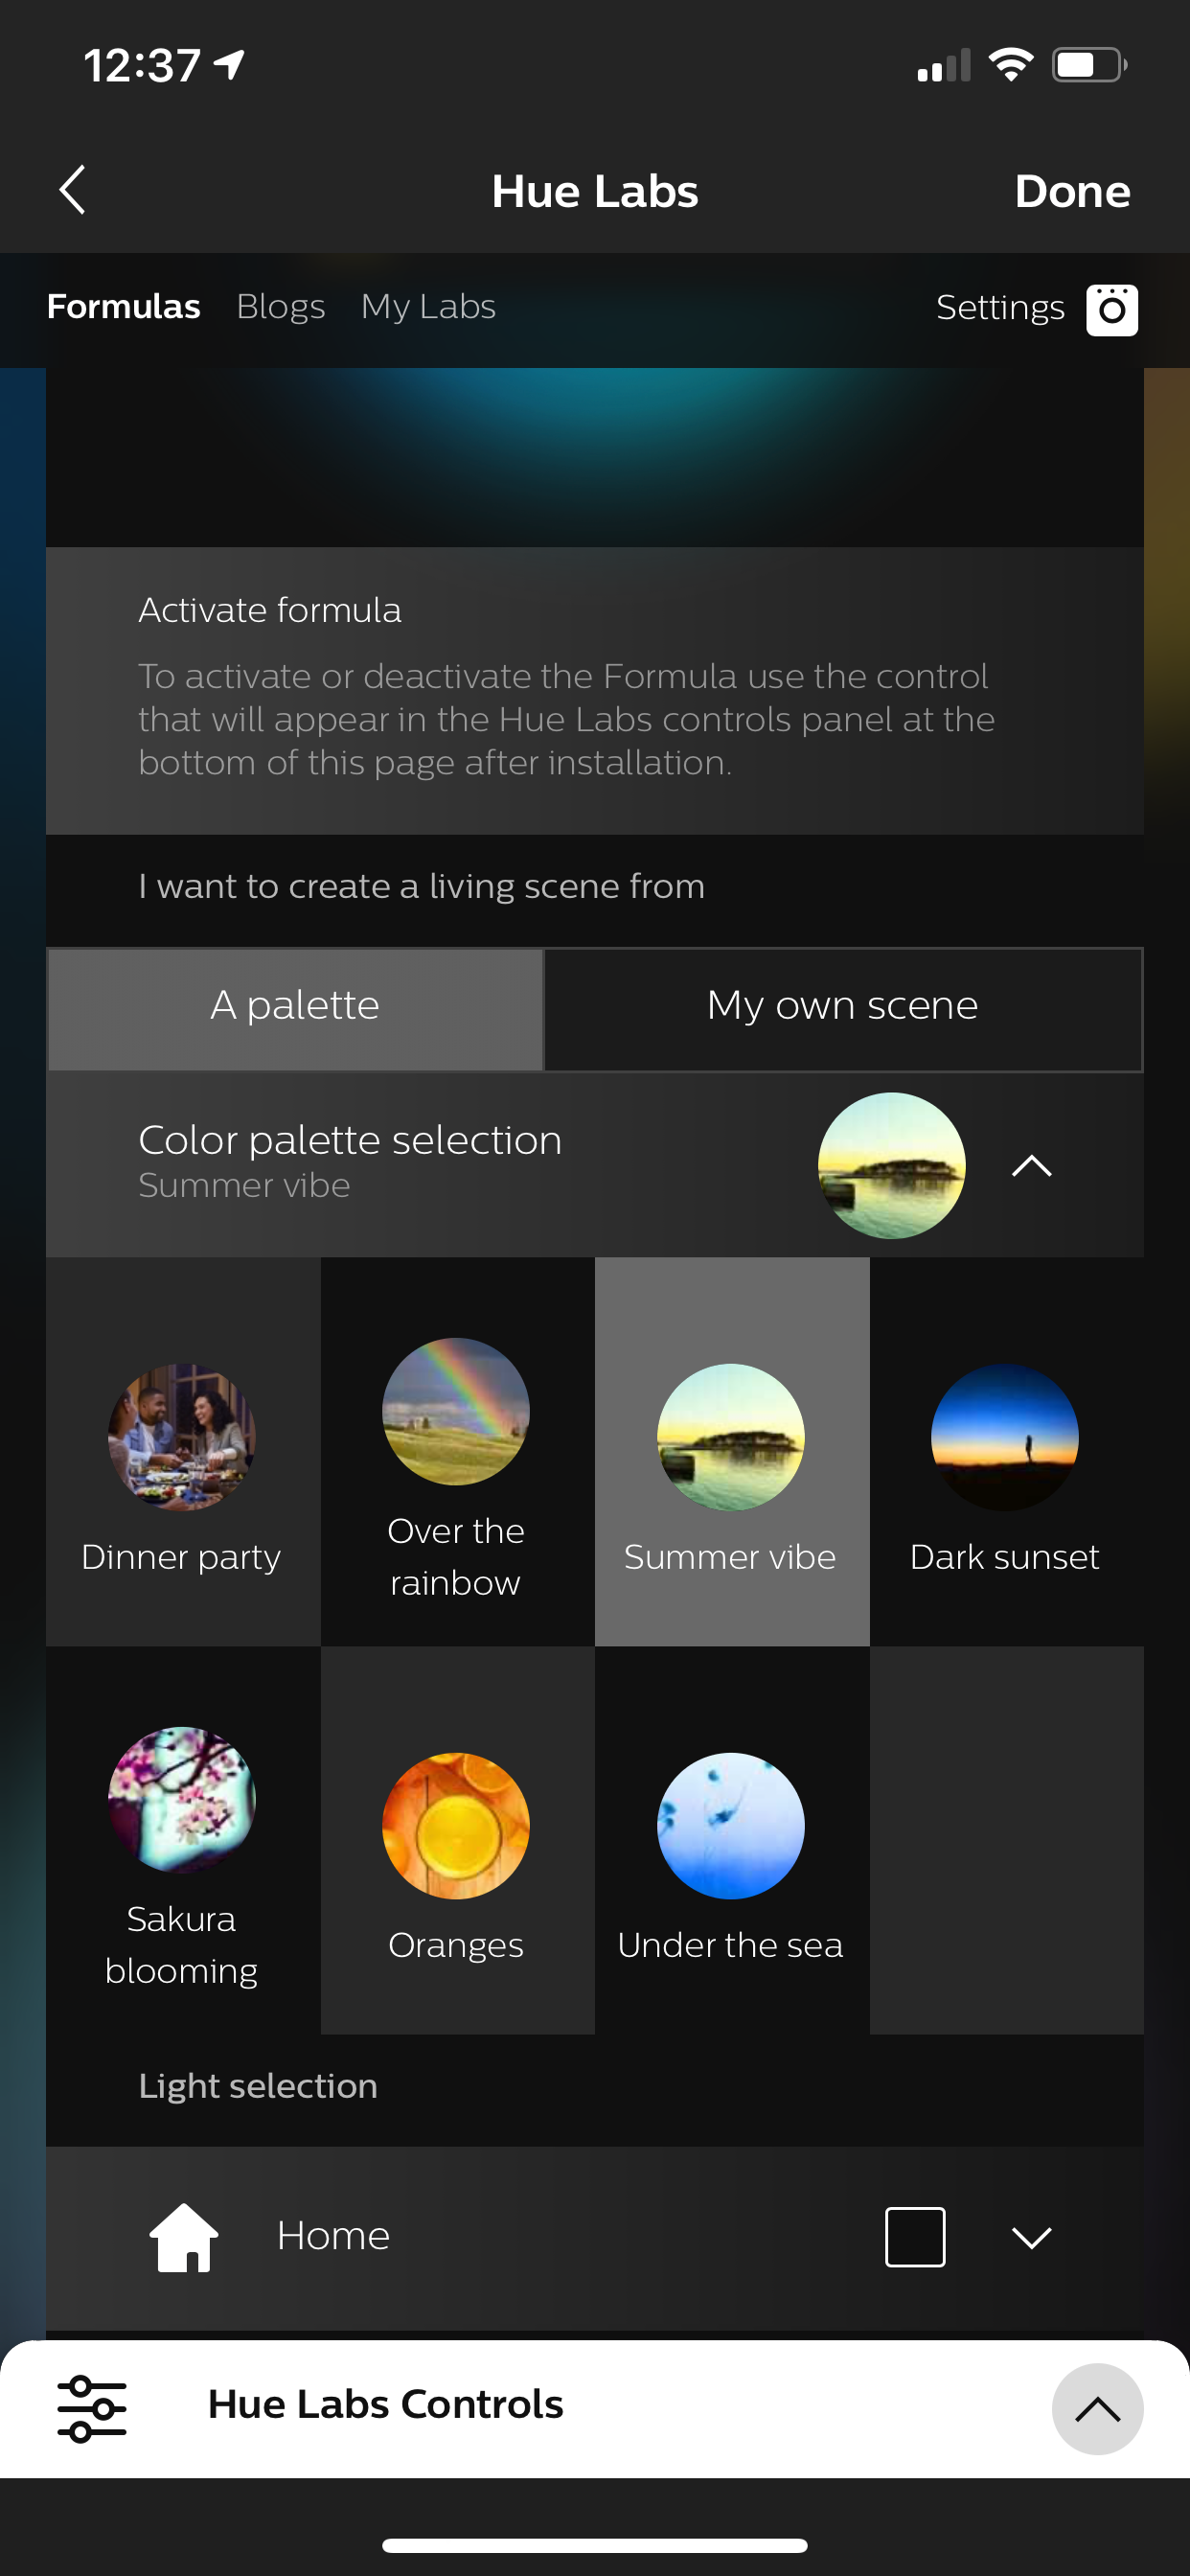
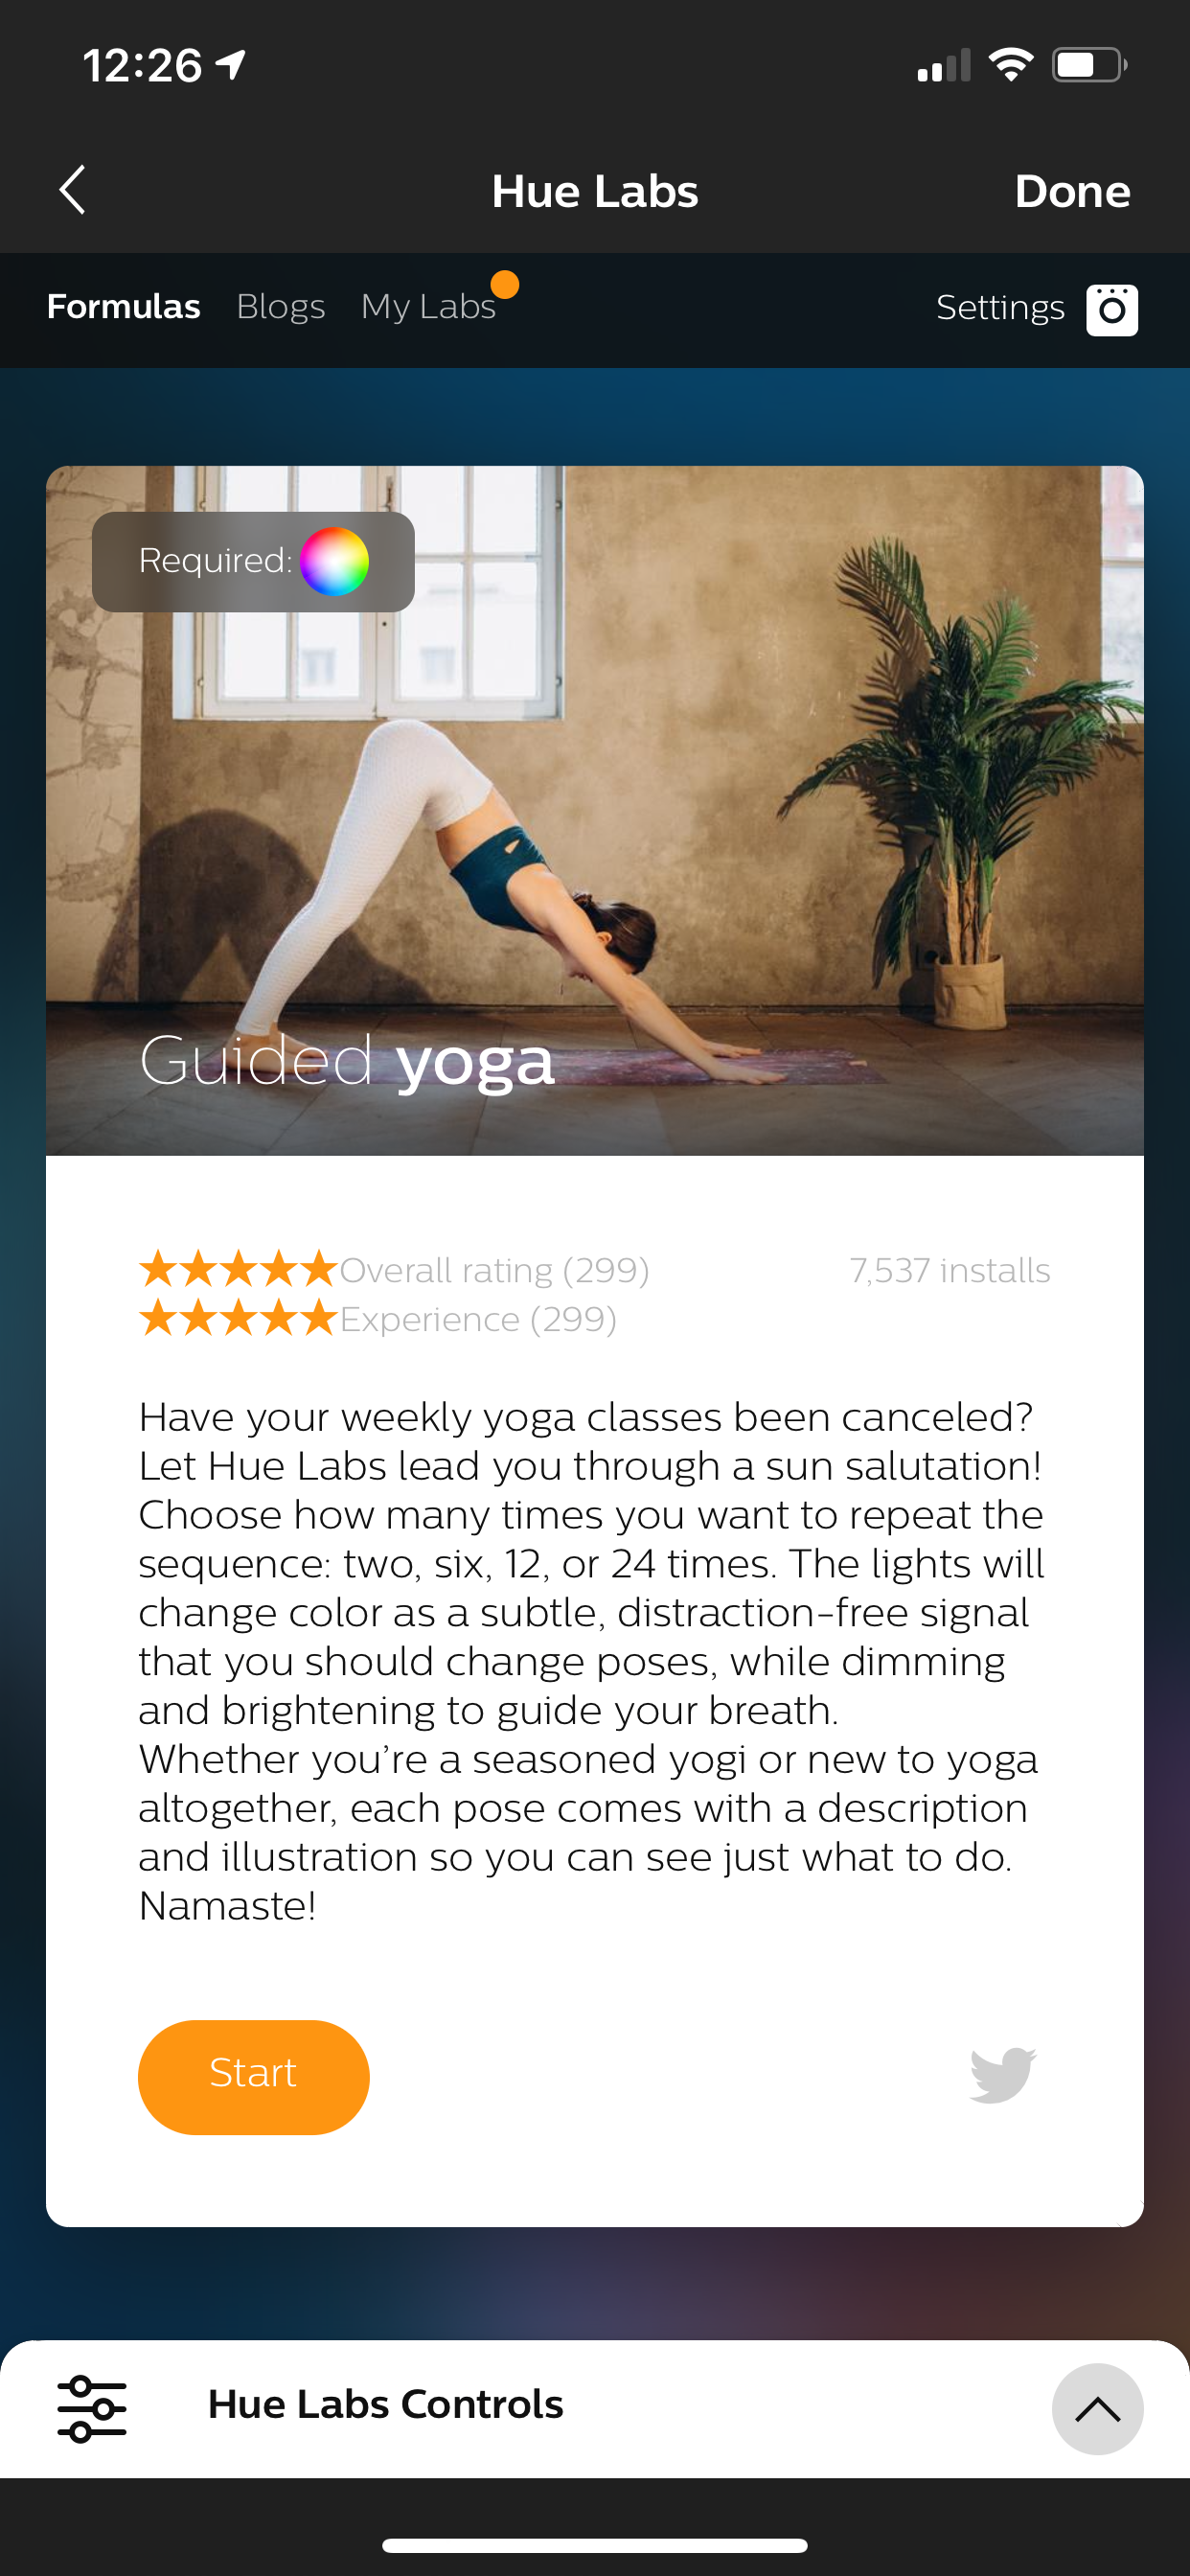
One of the best things about technology is the fact it's always evolving. That's also true for the Philips Hue lights. Because of the great app, Philips has been able to start cultivating a community with the Hue Labs section of the app.
Hue Labs is essentially a playground where Philips Hue customers can play with new kinds of functionality (at no extra cost) created by the Hue Labs team. These improvements in functionality come in the form of Formulas which are the equivalent of Apple's Shortcuts app. There's various different kinds of Formulas including guided yoga/workout sessions (the light colors changes signaling you should change poses/move to the next exercise, while dimming and brightening to guide your breath), color loops (where the lights will cycle through various colors), holiday scenes (different holiday-esq scenes cycle through), Star Wars themed ones, and so much more.
The Hue Labs team is constantly updating this section of the app with new Formulas all the time so I would definitely recommend checking it frequently to see what's new.
So what's the deal? Should I buy the lights?
Well, if it wasn't obvious already, the answer is definitively, yes! You should buy them. I truly believe they have a positive impact on your home environment, even if you're just sitting in a room watching TV or reading a book. Your lighting impacts you and your mood and if it were up to me, I'd say death to white light!
In fact, Mandy and I recently redid the cable management situation (post to come!) under my desk (which meant we had to unplug everything) and sitting in traditional white light for hours while reorganizing all the cables felt incredibly uninspiring.
All that being said, and if you're still reading by this point I've likely sold you on this idea, these lights are not cheap. The now nine total lights we have in my office set us back a cool $500. Expensive af. Truth be told that's likely why these lights aren't as popular as I think they should be.
A Philips Hue Starter Kit which comes with the Hub and four lights is currently retailing on Amazon for $220.
What would I do?
Start slow and be realistic. Buy the starter kit, setup an area in your home for the lights and start playing around with different scenes. Mandy and my goal is to eventually replace all lights in our home with Philips Hue lights – it's a good goal, but it'll take some time to achieve it.
Ultimately though, these lights will change your life. Just like they changed mine.
If you have Philips Hue lights, please leave a comment and let me know what you think of them!