How to build the ultimate podcast studio
Here's how to build the ultimate podcast studio with a mixer and a XLR dynamic mic, plus some other great hardware and software to make you sound like a million bucks.
I started my first podcast in 2008 and I remember attending PodCamp NYC in 2009 – it was such a great experience with so many people on the cutting edge of technology and media in one place. While 2020 is certainly a lot different than it was in 2008, one common element is the growing interest in podcasts. It's interesting because podcasts kind of faded in the early 2010s only to pick up in popularity again in 2016, with interest remaining strong (and growing) ever since.
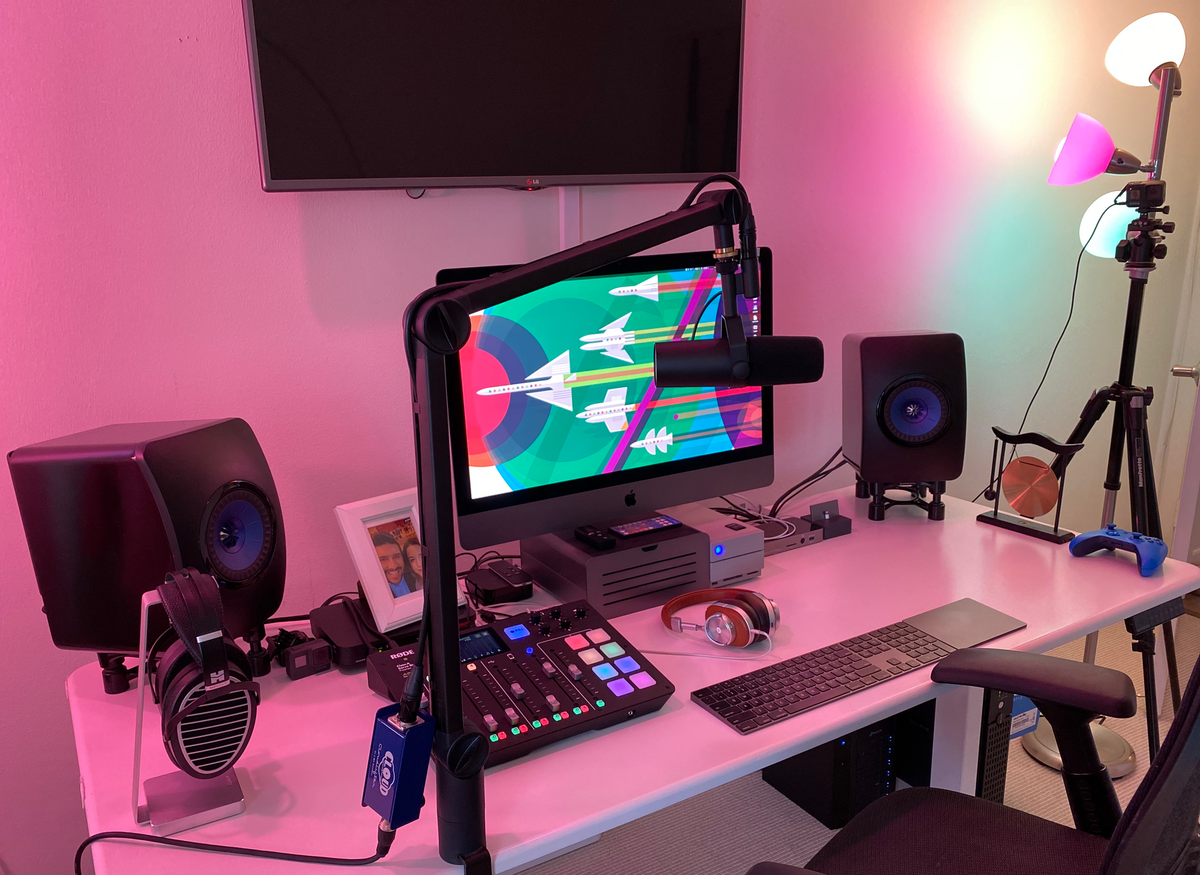
I've been releasing the TechieBytes podcast for a few years now and it sounds good, but I wanted it to sound even better. I wanted it to sound on par with how radio hosts sound on air, so I recently decided to look into ways to make it even better. Now, while it's true that it's cheaper and easier to get started podcasting than ever before as good quality [USB] microphones and accessories have gotten less expensive, in this article I'm going to show you how to build the ultimate podcast studio with a mixer and a XLR dynamic microphone, plus some other great hardware and software to make you sound like a million bucks.
Microphone
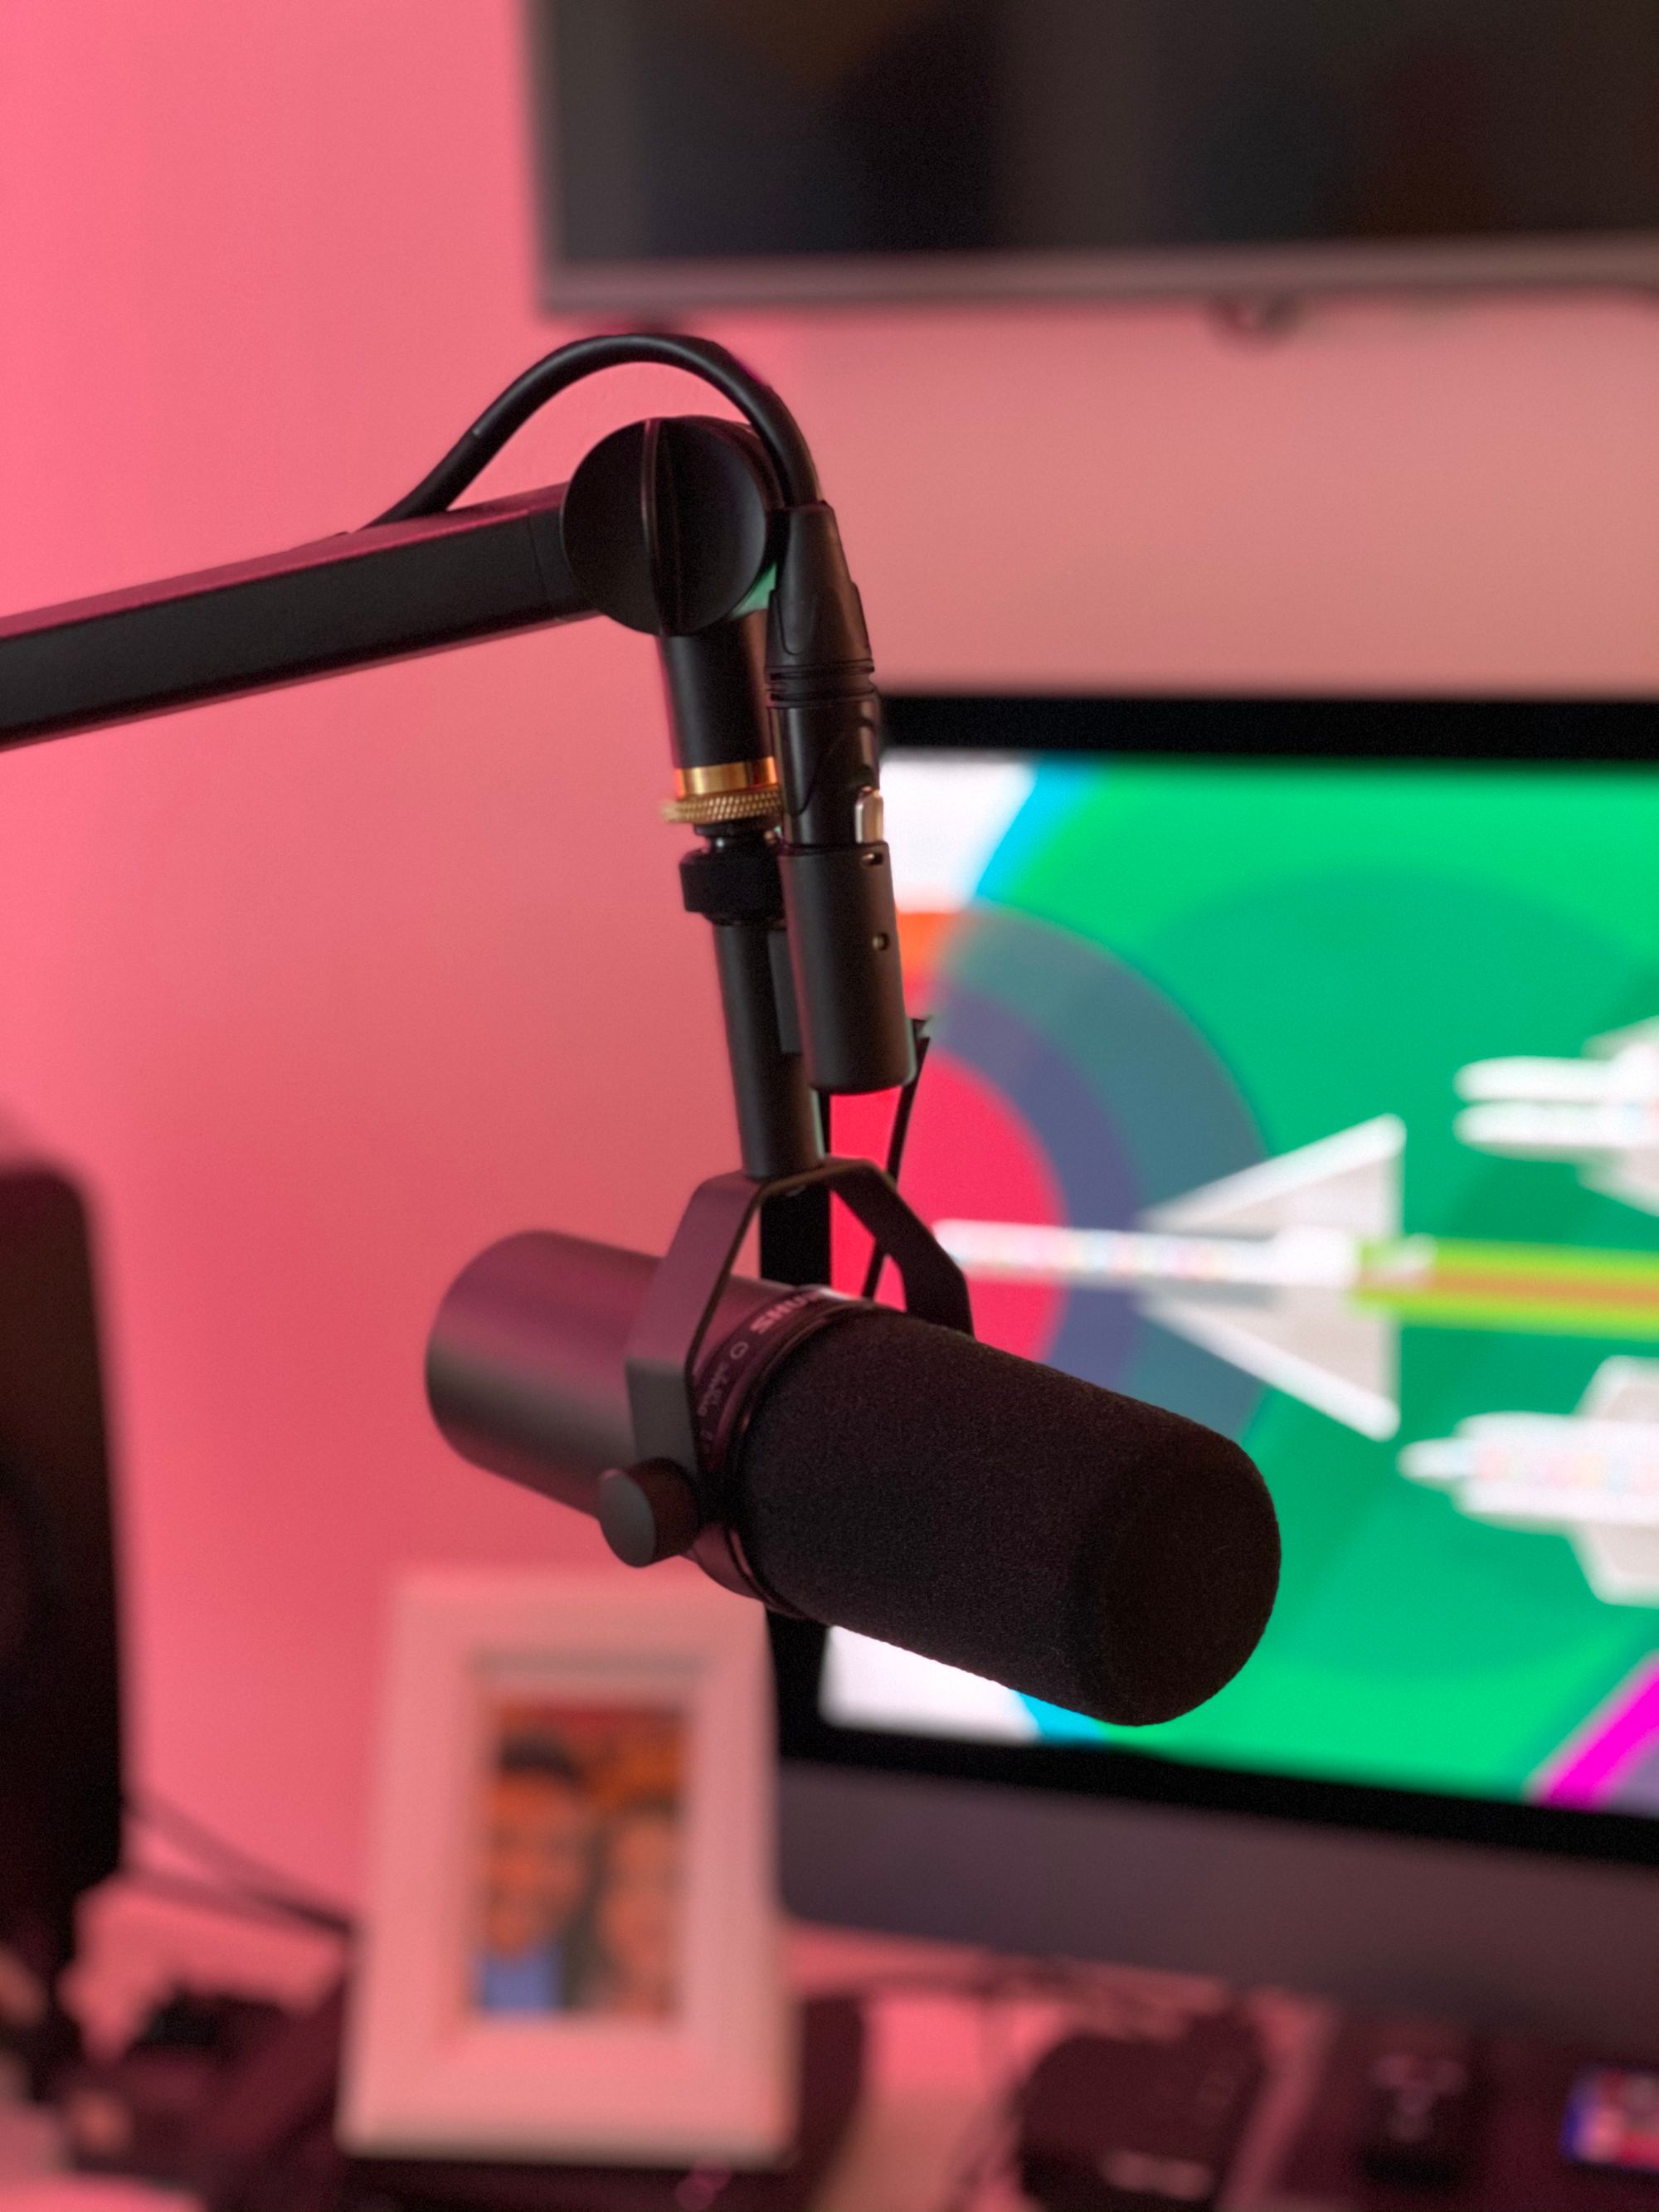
Since we're looking to build the ultimate podcast studio, you need an XLR microphone. XLR is the go-to standard for high-quality audio inputs, like microphones. This is because they send a balanced signal that isolates noise which is ideal for high quality audio recording or streaming. The microphone I recommend for your podcast studio is the Shure SM7B.
About the Shure SM7B
Shure based the SM7B on its original SM7 dynamic mic from the 1970s. These microphones were favorites among legendary artists, including Bob Dylan and Michael Jackson. The wide ranging frequency response results in clear, crisp, natural sound and its cardioid pickup pattern offers stellar rejection of ambient sounds so you will literally sound like your favorite radio show host when you get up close and personal with your microphone. This mic is literally the perfect choice for close-proximity work which includes use cases such as radio, podcasts, vocalists, and even to mic up instruments.
The Shure SM7B is also incredibly well-built. It rivals the build quality of pretty much any other microphone out there – it feels as good as it looks. The SM7B comes with a fully-adjustable bracket that easily mounts onto any mic stand (we'll cover which boom arm to get later). Its air suspension system is basically a built-in shock mount that works by eliminating any mechanical or handling noise. The SM7B also features a very effective built-in pop filter and a detachable windshield. And lastly, because it’s a dynamic mic that means it doesn’t require phantom power to function (though we still recommend buying a mic activator to boost the mics dBs – more on that later).
On top of all of that, the Shure SM7B isn't a sensitive mic which makes it ideal for a podcast studio with multiple mics and people recording at once. The SM7B will not pick up other people in the room talking at a normal volume level, unless they're essentially in front of the mic itself.
Bottom line: this microphone is incredible. You can find it on Amazon for $399. I bought two, one for myself and one for Mandy since we'll be launching our brand new Literally Ev podcast in the coming weeks.
Mixer
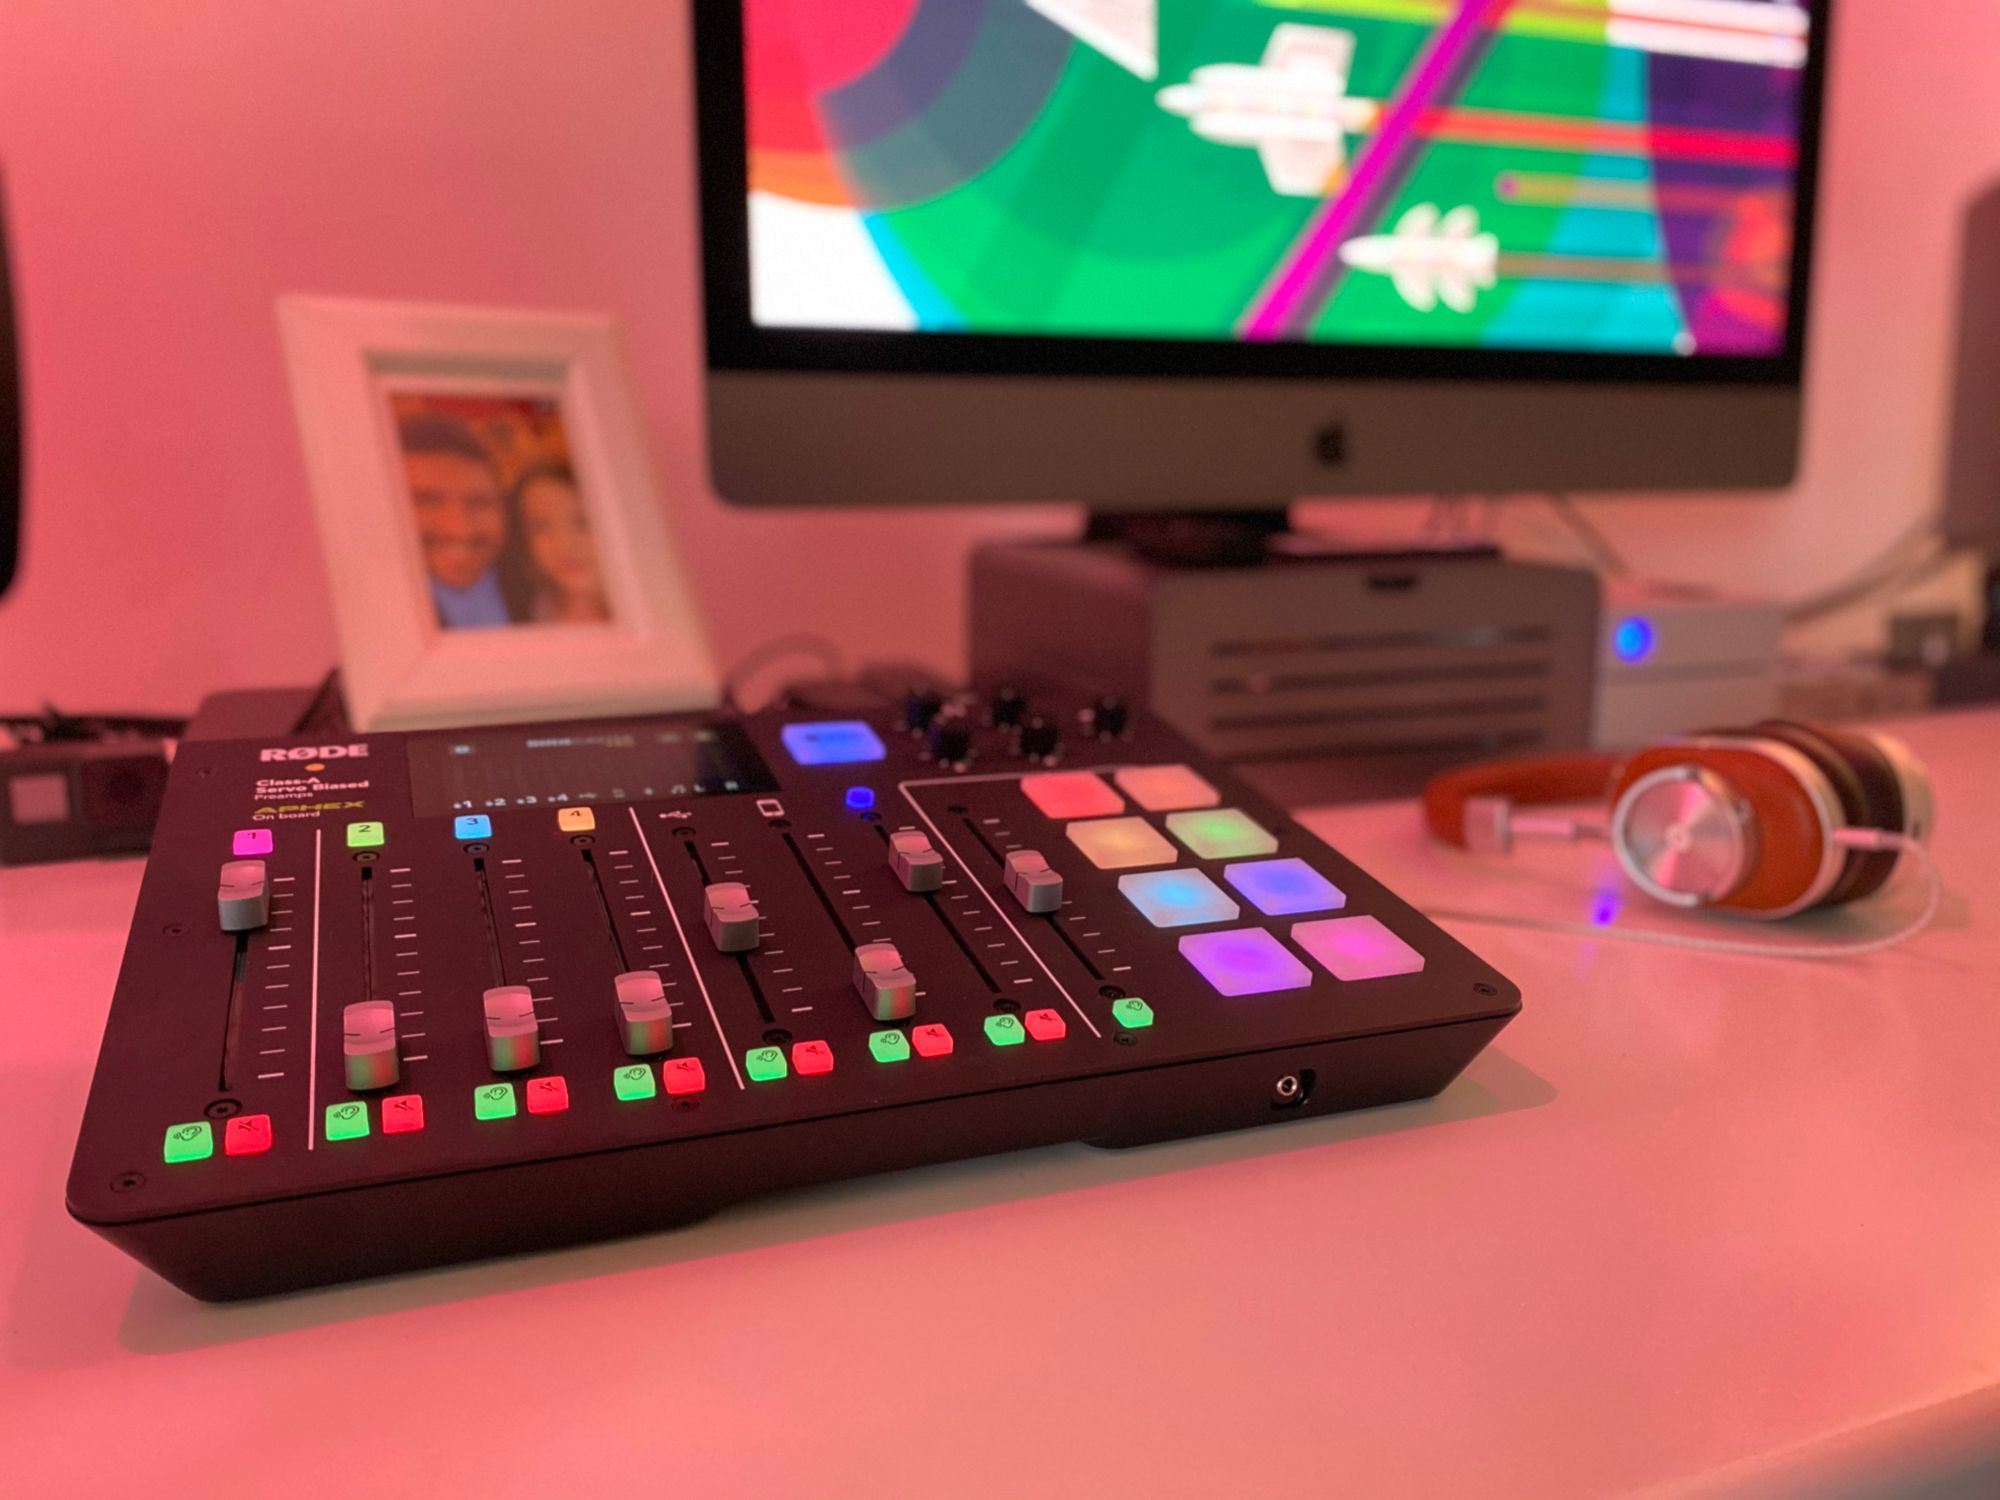
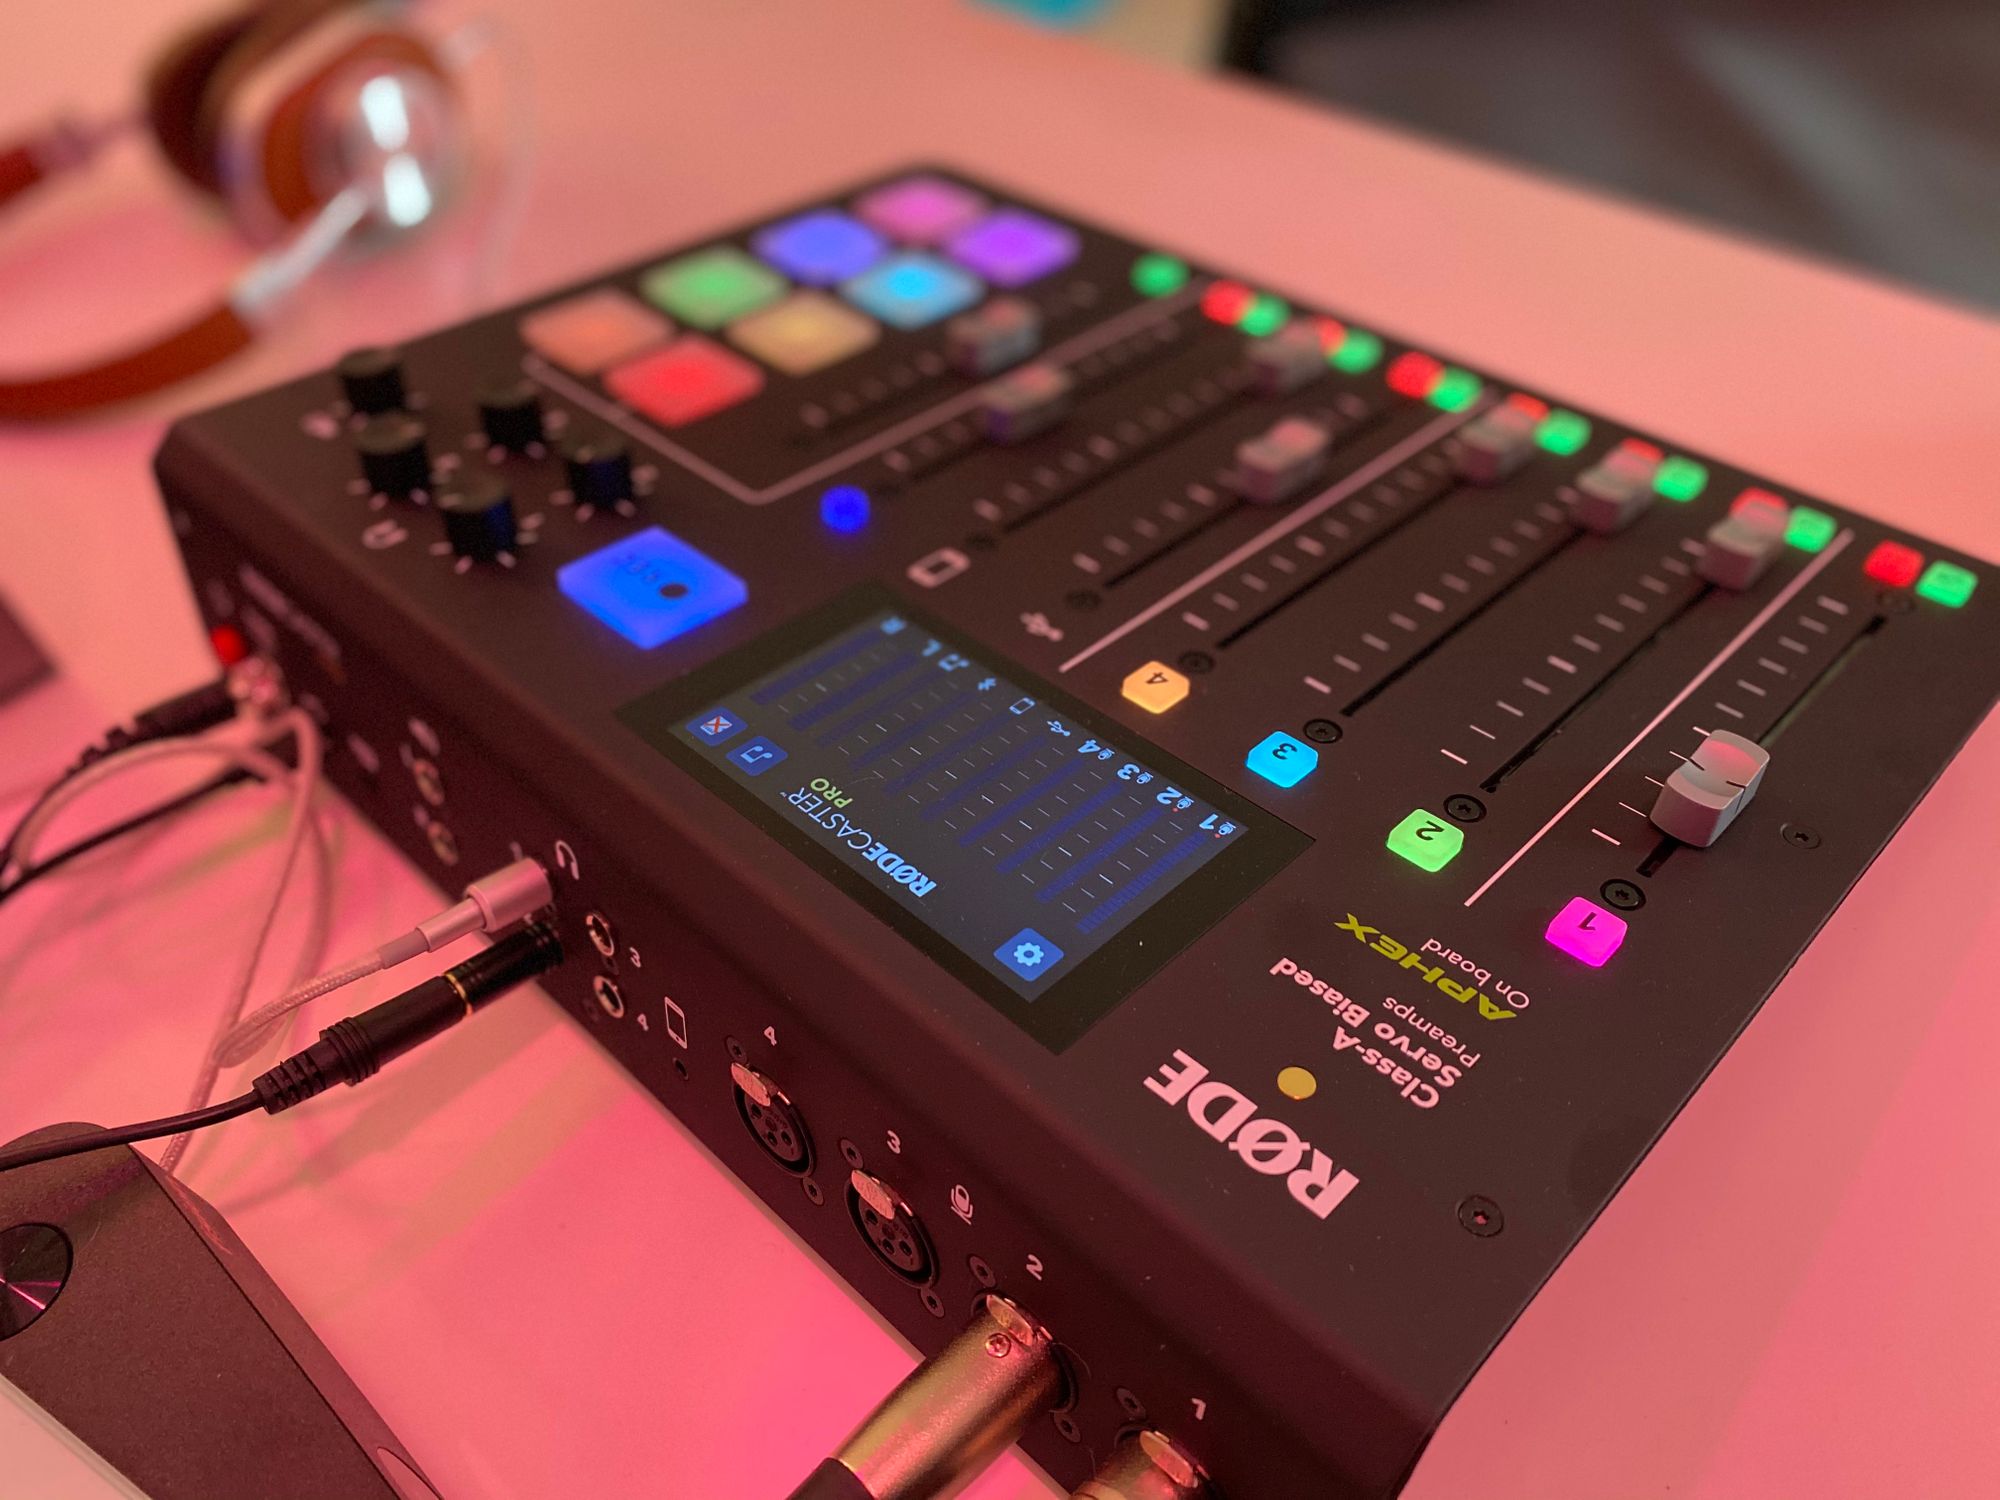
The next product you will need to build the ultimate podcast studio is a mixer. The mixer is essentially the heart of your podcasting setup. It's where you plug in your microphone(s), headphone(s), and is what you will be using to control everything from the mic levels to the sound board effects. The mixer I recommend for your podcast studio is the RODECaster Pro.
About the RODECaster Pro
The RODECaster Pro is a wonderful mixer that's great whether you're a seasoned pro or a beginner (like me). The only other time I had used a mixer was when I hosted a weekly radio show at my university several years ago. So when I bought this it was essentially the first time I ever setup anything like this – thankfully, these products make it super easy to get started.
The RODECaster Pro features four high-quality mic channels to power studio condenser mics, conventional dynamic mics, as well as automatic level setting and one-touch recording to a microSD card (I'm currently recording directly to my computer so I don't use this feature, but it's worth knowing about).
Perhaps one of my favorite features of the RODECaster Pro is the eight programmable sound effects pads that allow for the instant triggering of SFX, music, and more. What's really cool is that you can easily add new sounds to the mixer by either recording audio direct to the pads from any input or by adding files from your computer via the RODECaster app. You're not limited to eight either, you can have up to three pages or "banks" of sound effects accessible to your finger tips at any time.
Another nifty feature of the RODECaster Pro is the fact you can record interviews from people on the phone by connecting your phone to the mixer via Bluetooth or with a TRRS cable, which enables automatic “mix-minus” audio preventing echos being heard by callers.
As you would expect with a mixer, you have full control over mic levels, incoming audio levels from your computer/phone, as well as control over headphone volume levels as well.
Lastly, the RODECaster Pro mixer is able to power the Shure SM7B microphone without any additional hardware and it will sound good – though, it may seem a little quieter than you would like. If in fact that is the case and you want a way to boost your mics decibels I have a recommendation for you coming shortly. Read on!
Bottom line: this mixer is a great product – it's perfect for any podcaster. You can find it on Amazon for $599.
Buy the RODECaster Pro on Amazon
Headphones
When it comes to headphones, the most important thing is that they're closed back headphones. This means the sound won't leak out of the headphones and make its way to your mic – which as you can imagine is crucially important. I'm personally using a pair of Master & Dynamic MW60 headphones and Mandy is using a pair of Bose QuietComfort headphones. Both work fine for us. Chances are you can use a pair of headphones you already own, again, you just want to make sure they're closed back.
If you're looking for an affordable pair that will do you some justice, check out the Sennheiser HD 300 headphones that retail for $50.
Accessories
Here are the accessories you need to buy as well. I'll note which are absolutely required and which are "really nice to have's."
Cloudlifter (really nice to have)
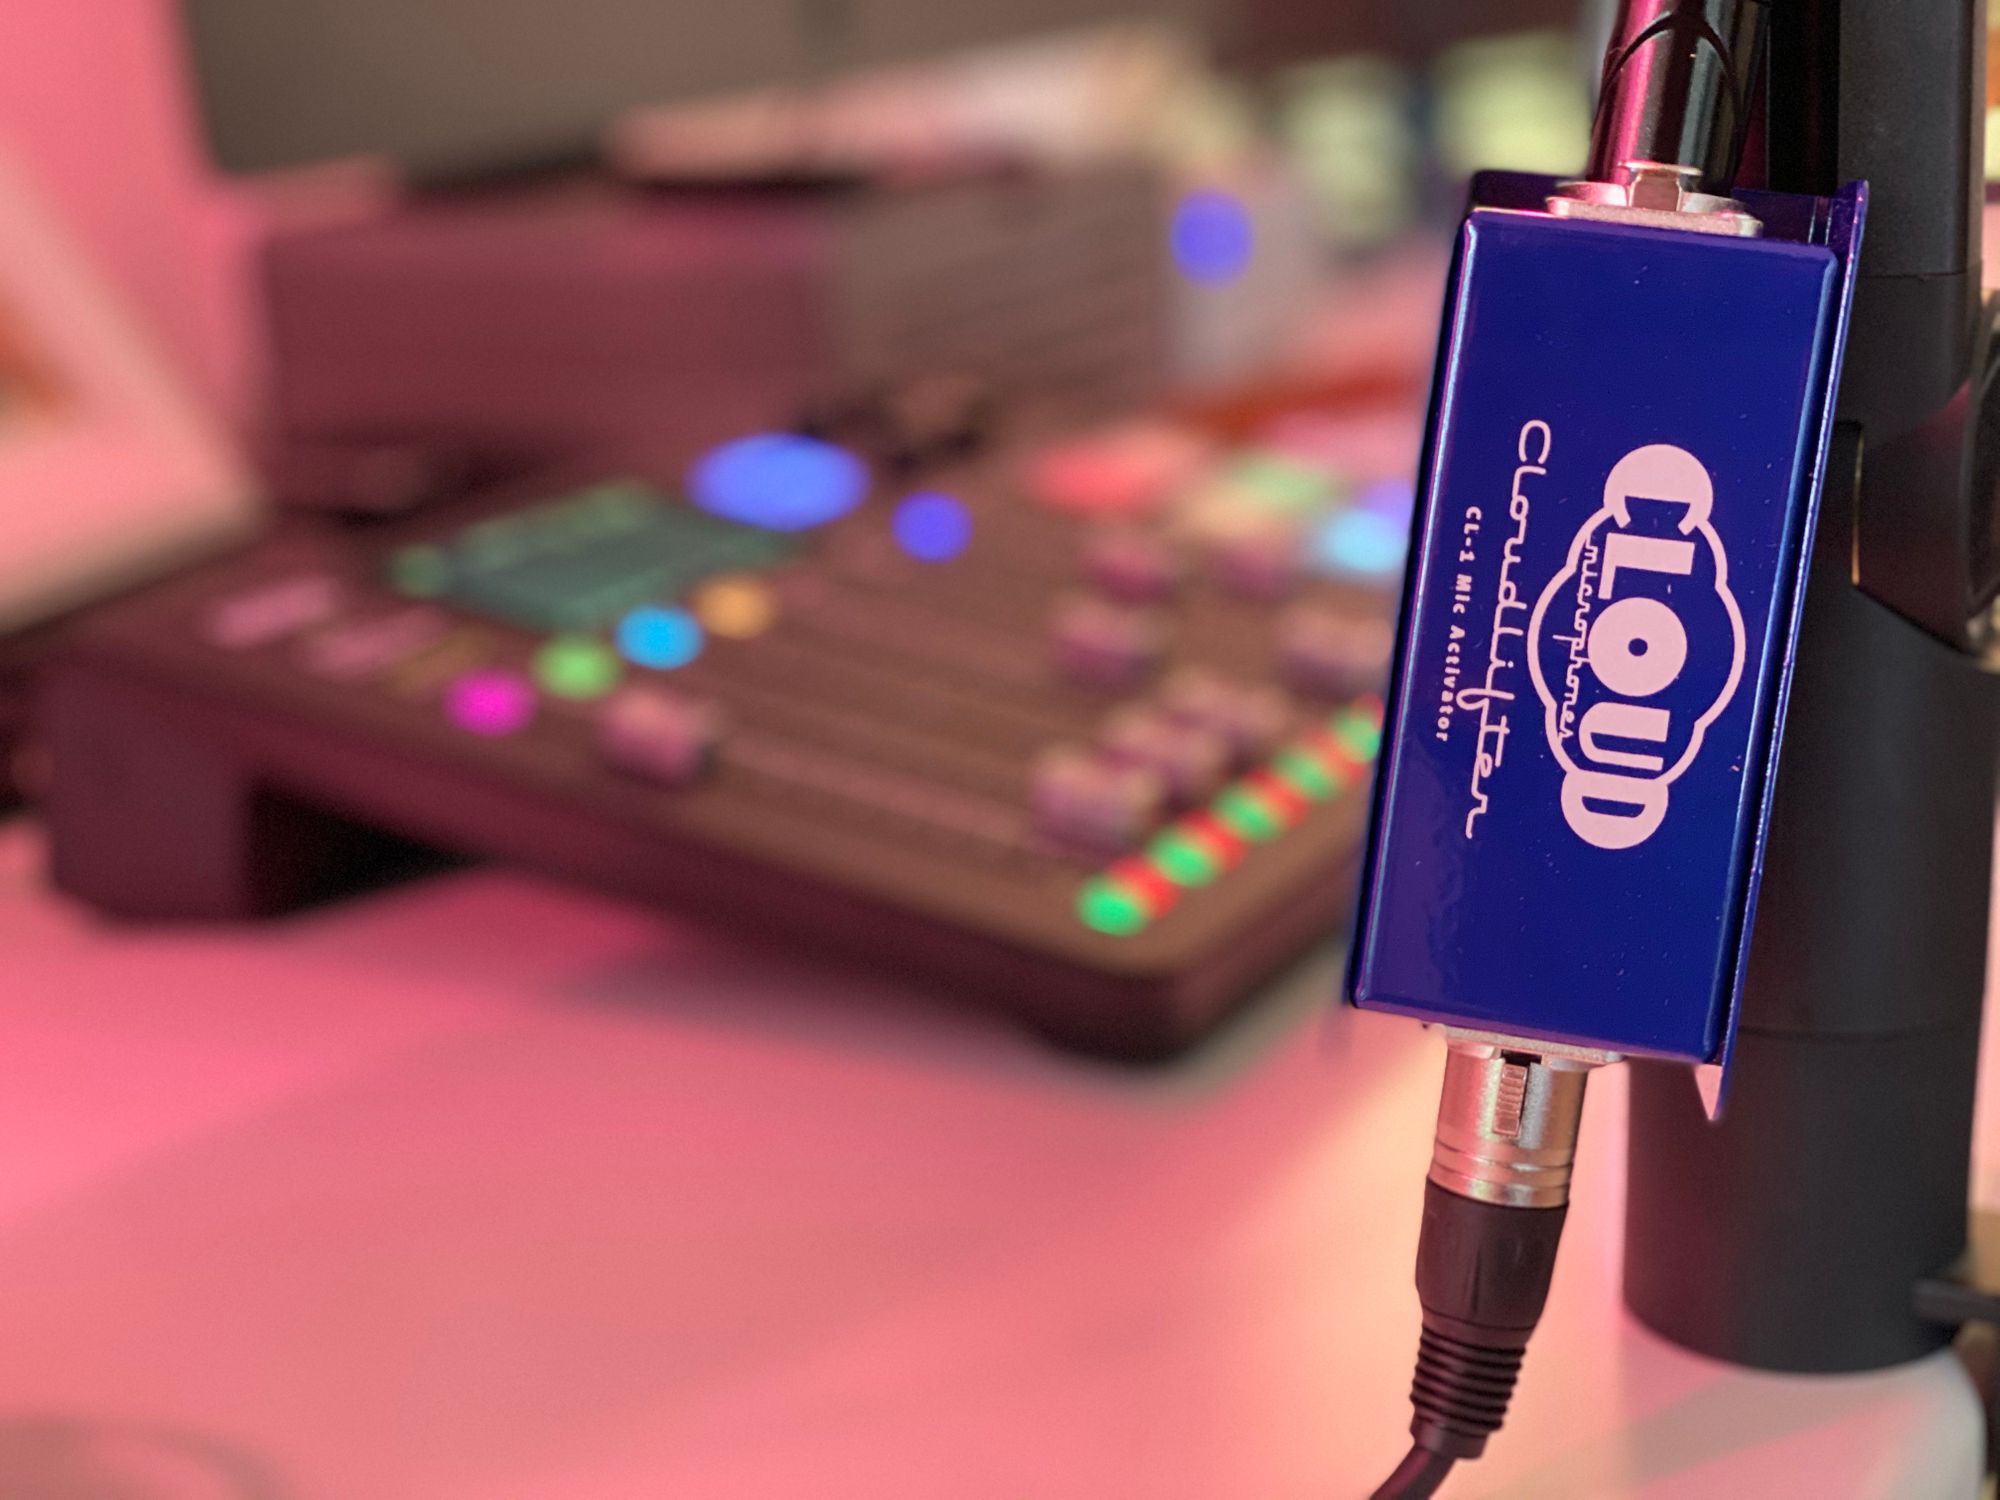
The Cloudlifter CL-1 is a neat little piece of hardware. Here's what it does: the CL-1 uses phantom power to give passive mics (e.g. dynamic and ribbon mics) up to +25dB without passing phantom power on to mic. The result is that you sound phenomenal. While this product isn't required, I would highly recommend it as it makes a huge difference. The Cloudlifter CL-1 retails for $150 which at the end of the day is a totally worthwhile investment in the grand scheme of things.
XLR cables (required)
When it came to cables, I bought a few kinds of XLR cables. The first XLR cable I bought was a 6 foot one which goes from the RODECaster Pro mixer to the Cloudlifter CL-1 that connects to a second 3 foot XLR cable which then plugs into the Shure SM7B microphone.
Note: you only need the additional, shorter XLR cable (3 foot) if you buy the Cloudlifter as you need to connect the Cloudlifter between the two cables.
The last XLR cable I bought was a 20 foot one that goes from the RODECaster Pro mixer to our second studio microphone.
Headphone cables (required)
When it comes to plugging your headphones into the mixer, you should be able to use the regular headphone cable along with a 1/4 male to 1/8 female stereo adapter (the mixer requires a 1/4 male connector). Most decent headphones come with one of these adapters included, however, if you don't have one or can't find it, you can pick one up on Amazon for $6.
Now if you require some more length for your headphone cable, you can also invest in an audio extension cable. That's what I did for Mandy's headphones since she sits on the other side of the room from the mixer. You can buy a 25 foot audio extension cable for $10.
Blue Compass (required)
In terms of a boom arm (this is the product you attach to your desk which will hold the microphone near your face), I would highly recommend you take a look at the Blue Compass. It's the best-made boom arm I've come across – it's well-built and it uses a locking mechanism to keep the arm's height in place. Plus it has built-in cable management along the top of the arm. Another option that I have heard a lot of good things about is the RODE PSA1 boom arm though I believe it doesn't offer as good cable management. Both boom arms retail for $99.
Secondary microphone stand (required if you buy a second mic)
As I mentioned earlier, I bought a second Shure SM7B for Mandy to use for our upcoming Literally Ev podcast, which meant we needed second stand for the second mic. Having already spent a boat load of money on the mic and mixer, I was looking for something first-rate but hopefully inexpensive. My quick Amazon search brought me to this AmazonBasics tripod boom arm which retails for $20 and so far works great. It's easy to setup and has multiple locking mechanisms to ensure your mic stays put.
Software
If you want a killer podcast you also need some good software. I'm a Mac user so my software recommendations skew more towards those who use macOS but some of them also exist on Windows too (or you can look for similar-type Windows apps).
Adobe Audition
I use Adobe Audition to edit my podcast. I find it simple enough to use without it giving me a massive headache – so that's a plus in my mind. While it offers a full suite of features to do all kinds of effects and edits, the one I mostly focus on now with my new podcast studio is the reverb effect. Adding a dash of reverb to your recording can really do wonders, especially if you have guests on who are elsewhere – the reverb effects make it feel like they're in the same room as you.
My only tip when it comes to reverb is less is more. The trick is, when you are playing around with the sliders in Audition to find the right amount of reverb to add, once you think you found the right amount, turn it down a tiny bit more and apply it.
Adobe Audition is available as part of Adobe Creative Cloud and is available for Mac and Windows.
Audio Hijack
I've been using Audio Hijack for many years now, I love the interface, simplicity of use, and the killer features that let you record any sound coming from your Mac. However, now that I have a mixer, many of the app's features aren't as necessary, but I do like the interface so I use it to record all sound coming from my mixer and it works really well. I've configured Audio Hijack to record everything to a WAV file which I then import into Adobe Audition to edit (and subsequently export as a MP3 for uploading). Audio Hijack retails for $60.
If you don't have a Mac or you don't want to spend the money on Audio Hijack there are alternatives that are free or cost less. For example, Audacity is a great, open source audio recording app that is cross platform (macOS, Windows, and Linux).
Streamlabs OBS
I recently started recording video along with the audio for TechieBytes and this is how I do it. If you want to record a video podcast in addition to audio, you need to read on.
There are many variations of OBS (Open Broadcaster Software) out there but the one I like the most is the version from Streamlabs. The Streamlabs OBS is completely free to download and they also offer a store where you can purchase different graphics packages to use in your video. Additionally, you can upgrade your Streamlabs OBS account if you want to be able to live stream on multiple platforms (e.g. Twitch, YouTube, Facebook). We don't live stream the podcast yet but it's nice to know this functionality exists for the future. For now, I just use the record button to have Streamlabs OBS record an "offline" video that gets saved to my hard drive.
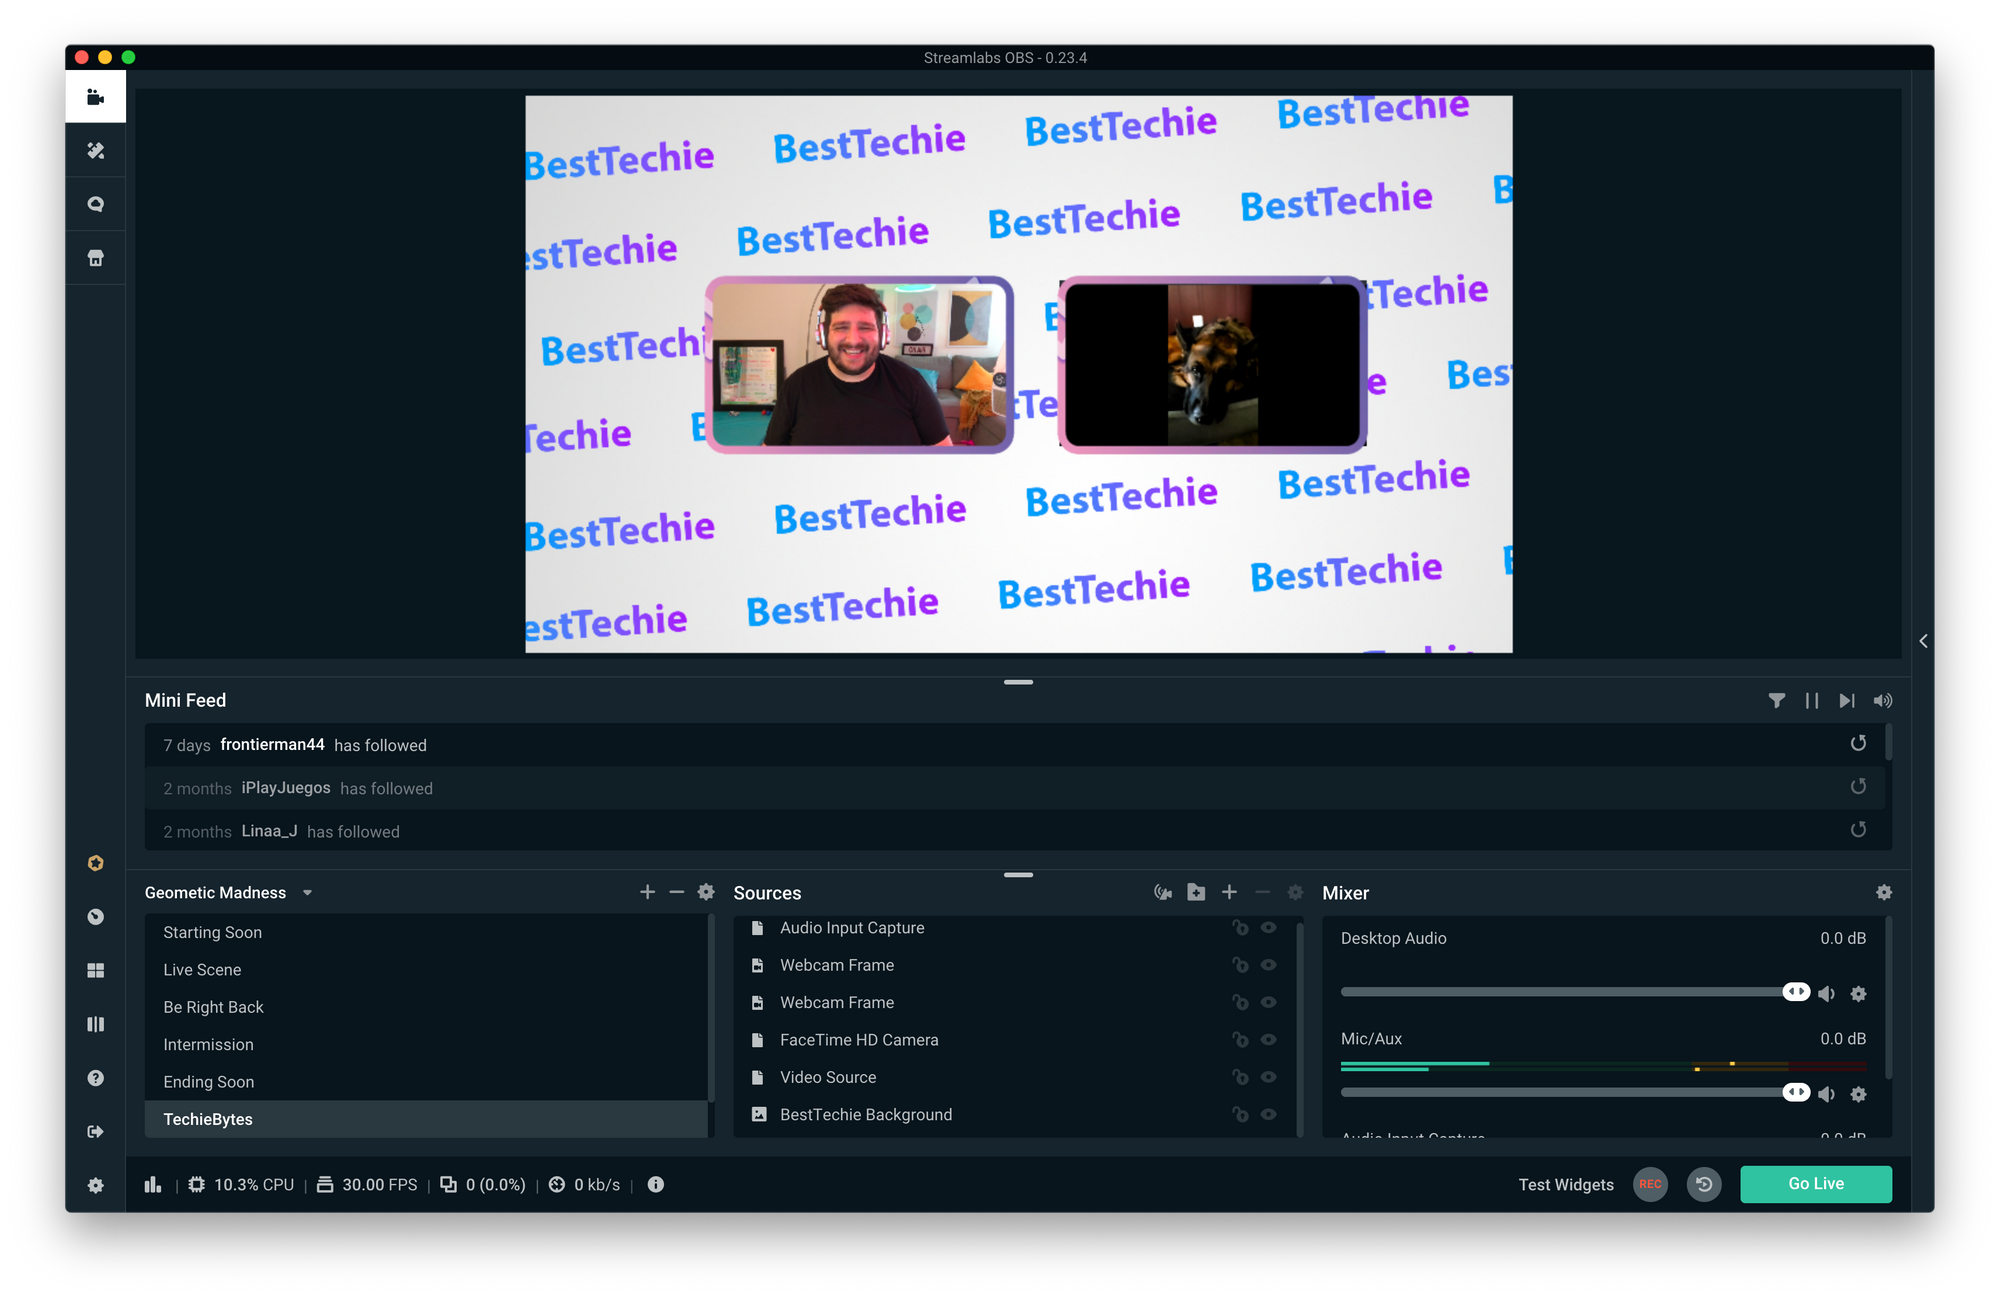
I really like Streamlabs OBS because it allows me to create a high-quality production that features multiple cameras, widgets, and other graphics. Above you can see me practicing my video podcasting technique with Odie the dog.
Cameras
If you have a podcast and want to add a video element to it, you'll need a camera. Now, I've been using the built-in FaceTime camera on my iMac Pro which works fine for me. If you have somewhat recent computer that has a built-in webcam it's likely good enough, that being said, what if you want to add a second camera to your studio? Adding a second camera is an excellent idea, especially if you plan to have guests in the studio – you'll want them to have a dedicated camera for them and with Streamlabs OBS you can configure it separately bringing both views side by side (as shown in the above screenshot with me and Odie).
GoPro Hero8
So which camera do I recommend? The GoPro Hero8. It's a small, high-quality camera that can shoot and stream 1080p video. Plus, with the GoPro Webcam software you can connect it directly to your computer via USB and use it just like a webcam (which is exactly what I do and it works great).
You will also need a tripod that you can use to mount the GoPro Hero8 to. Luckily, I have some recommendations for tripods as well. The tripod company that I really like is Manfrotto. They have a variety of different tripods in multiple price categories, just be sure to also buy any necessary adapters to ensure the GoPro Hero8 can be mounted to the tripod. I've had my Manfrotto tripod for probably almost 10 years now and I love it.
How you'll sound
And now that you've made it to the end (good job – you're now well on your way to becoming a professional podcaster!), here's the intro from my most recent podcast episode featuring Kamyl Bazbaz, VP Communications at DuckDuckGo that I recorded in my new studio.