How to setup NordVPN on your computer within 5 minutes
You can't be too careful online these days. That's why it's important to utilize a VPN, such as NordVPN, when on the internet. Here's how to setup NordVPN.
Let’s talk VPNs, specifically how to setup NordVPN, but before we do if you are unfamiliar with what a VPN is, a VPN or Virtual Private Network is a method used to add security and privacy to private and public networks, like WiFi Hotspots and the Internet. VPNs are most often used by corporations to protect sensitive data, however, they are also becoming extremely popular for personal use.
Essentially when you use a VPN, instead of connecting directly to your ISP and/or that public WiFi network, you connect to a server run by your VPN provider (a “VPN server”) via an encrypted connection (sometimes referred to as a “VPN tunnel”). This means that all data traveling between your computer and the VPN server is encrypted so that only you and the VPN server can “see” it. Obviously this means you have increased privacy and security around what you’re doing online.
But before you go out a buy access to a VPN from a VPN provider, it’s important to know a few important details.
First, not all VPNs are equal–it is incredibly important to pick a VPN provider that uses solid encryption, ideally, look for OpenVPN or IKEv2. Additional security features that are nice to see (meaning they’re really really secure) include: perfect forward secrecy being enabled, hash authentication of at least SHA256, and Cipher of at least AES-256. Another point worth mentioning with regards to security and privacy is a feature I always look for when it comes to picking a VPN provider is to make sure they do not log.
It’s also really important to research where the VPN provider has server located. Remember you are routing your internet traffic through them so if the servers aren’t local/close to you that will increase latency and slow down your internet speeds.
Another key piece of advice: look into how many simultaneous connections you can have running through your account. Every provider is different.
Lastly, be sure to check their software offerings and make sure they have software that will run on your hardware, including your computer, smartphone, and tablet. Not all VPN providers have dedicated clients for every device, so finding one that will work with all of your devices will make your life much easier.
My current favorite VPN provider (and who I personally use) is NordVPN. NordVPN is an excellent provider with a ton of features and support for many devices, including apps for Mac, Windows, iOS, Android, and game consoles. NordVPN operates more than 746 servers in 58 countries and with Nord you can connect up to 6 devices under one account. Nord is also P2P friendly and doesn’t impose bandwidth limits. They also have a strict no logging policy which as I mentioned before is great for user privacy.
Some stand out features include: double VPN for increased anonymity, IKEv2/IPsec, OpenVPN, PPTP, L2TP, IPSec security protocols offered, and a free proxy list (up to 3,000 free proxies).
Now, this may sound somewhat complicated and while the underlying technology surely isn’t simple, the folks over at NordVPN have made it super simple to setup and use their service. In fact, once you signup, you can setup NordVPN within 5 minutes. Ok, so now that I convinced you that you should use a VPN, here’s how to setup NordVPN on your computer once you have signed up. The screenshots below were taken on my MacBook Pro running macOS but it’s pretty much the same on Windows.
Launch NordVPN
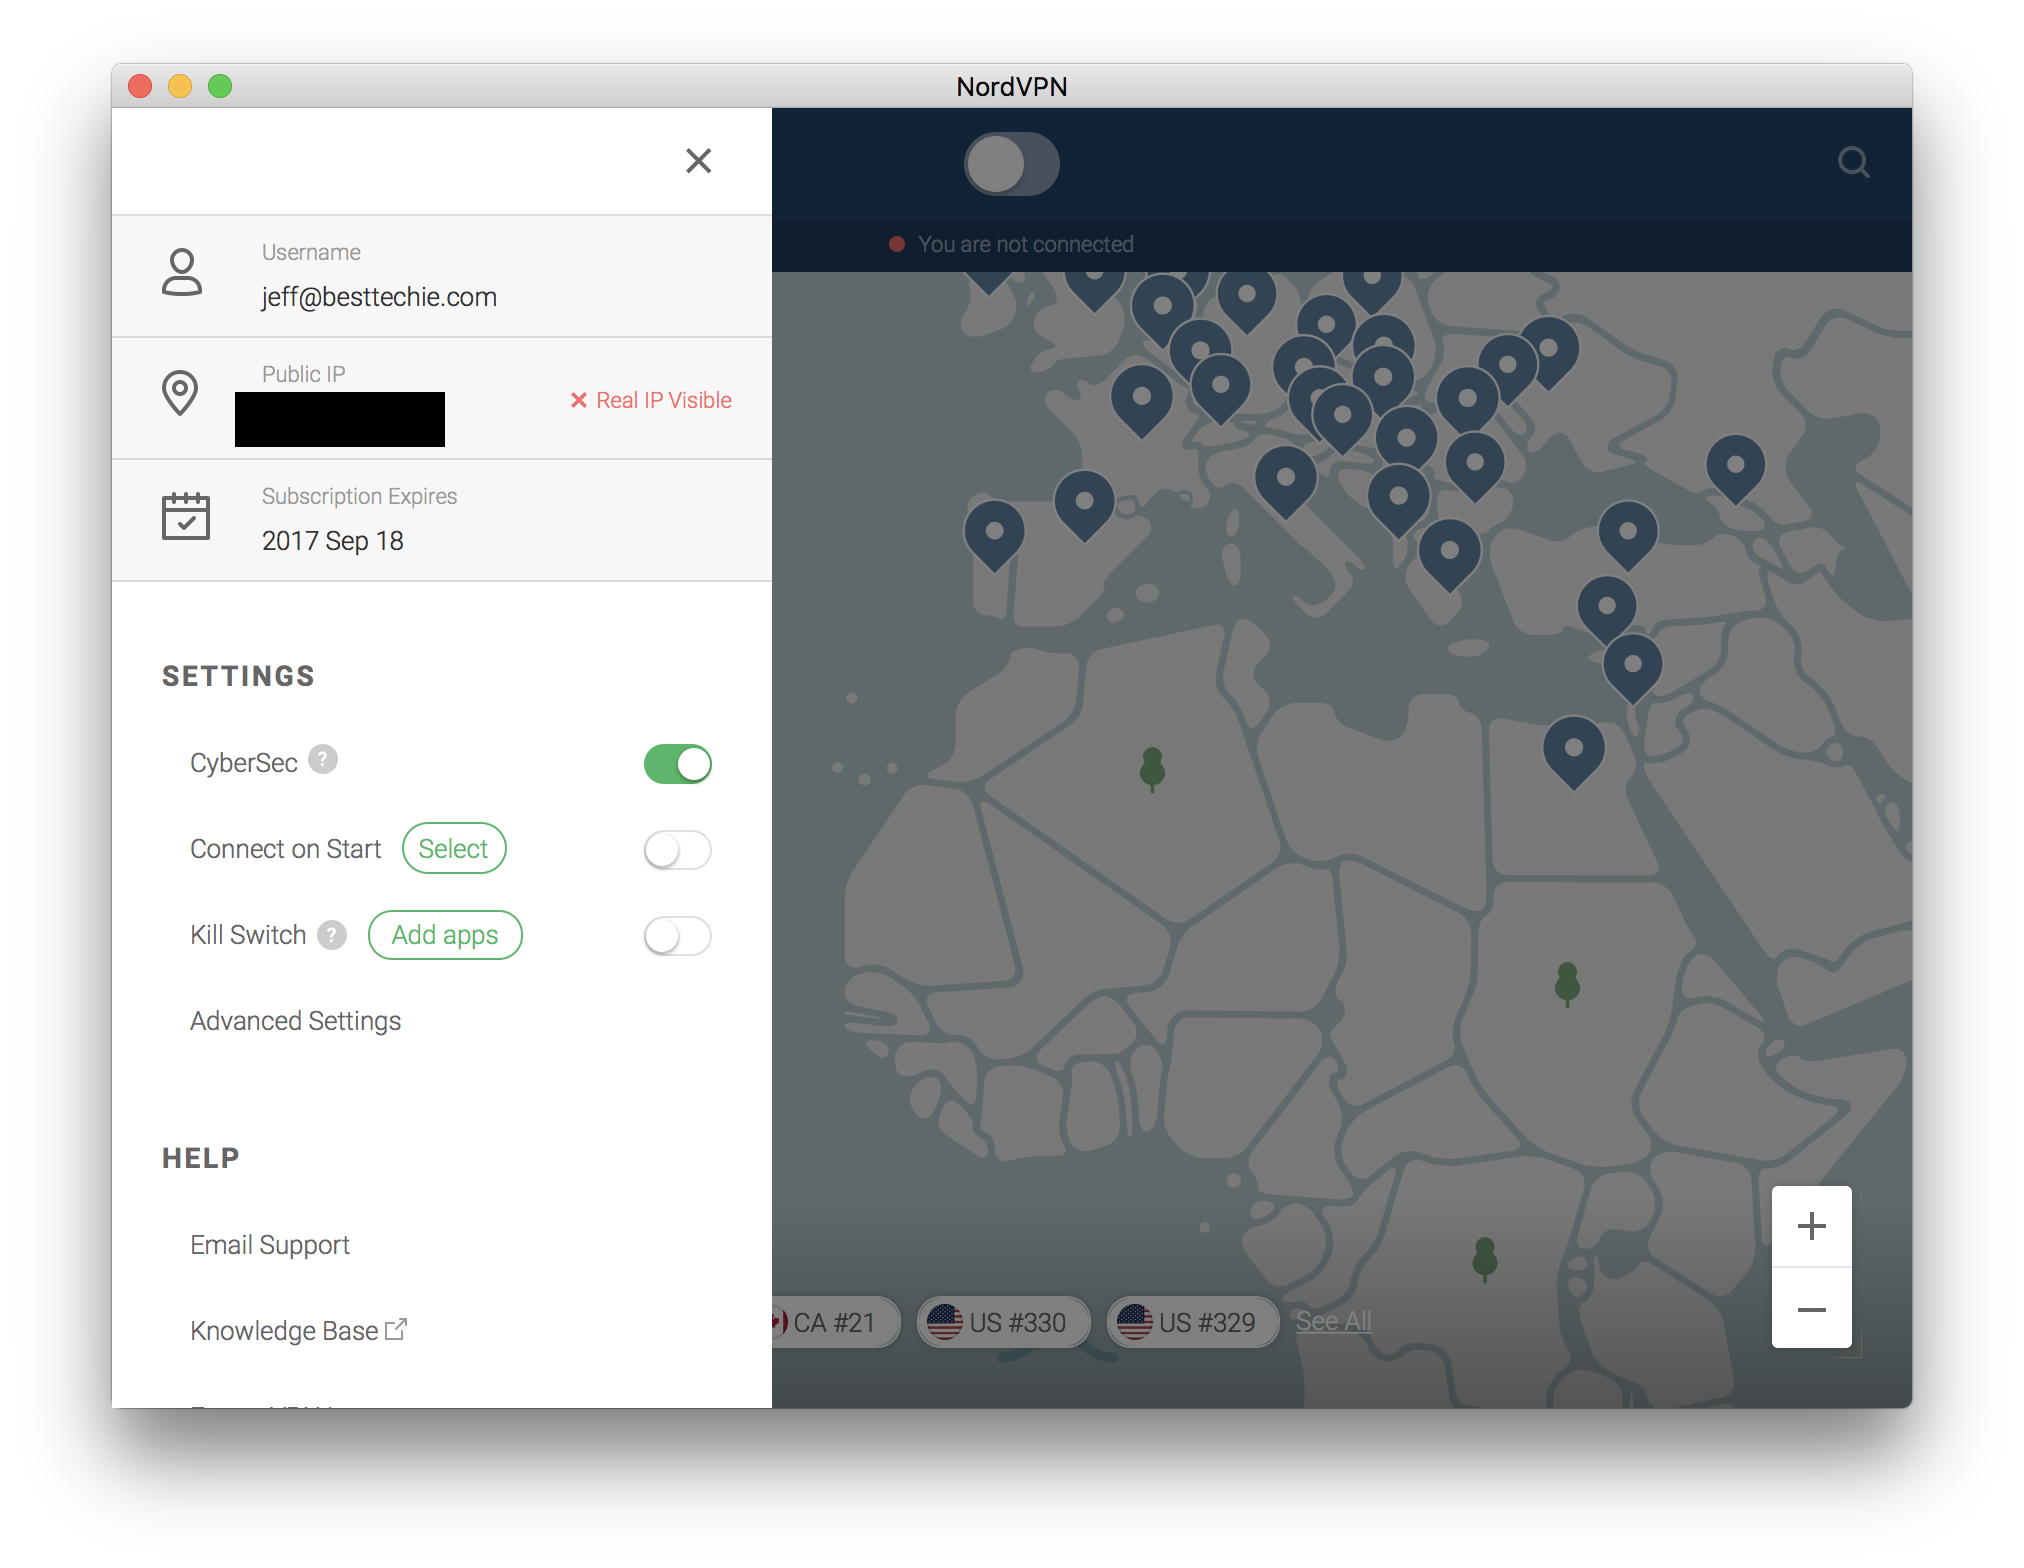
Open the NordVPN app and you will see a screen like the one below, this is the NordVPN home screen. From here, you can access pretty much everything you would need to connect to one of the servers in the NordVPN network. In fact, if you simply toggle the switch at the top-center of the window you will be automatically be connected to a server in the network and you could technically go on your way. That being said, I’d recommend selecting a server manually based on its physical location and how close it is to you. This will reduce latency between you and the VPN server meaning it will help make sure your connection remains fast. Keep reading to see how we do that. Lastly, if the CyberSec option isn’t toggled on, I recommend you do so. This option helps protect your computer from malware, phishing, and other baddies.
Easily connect for certain purposes
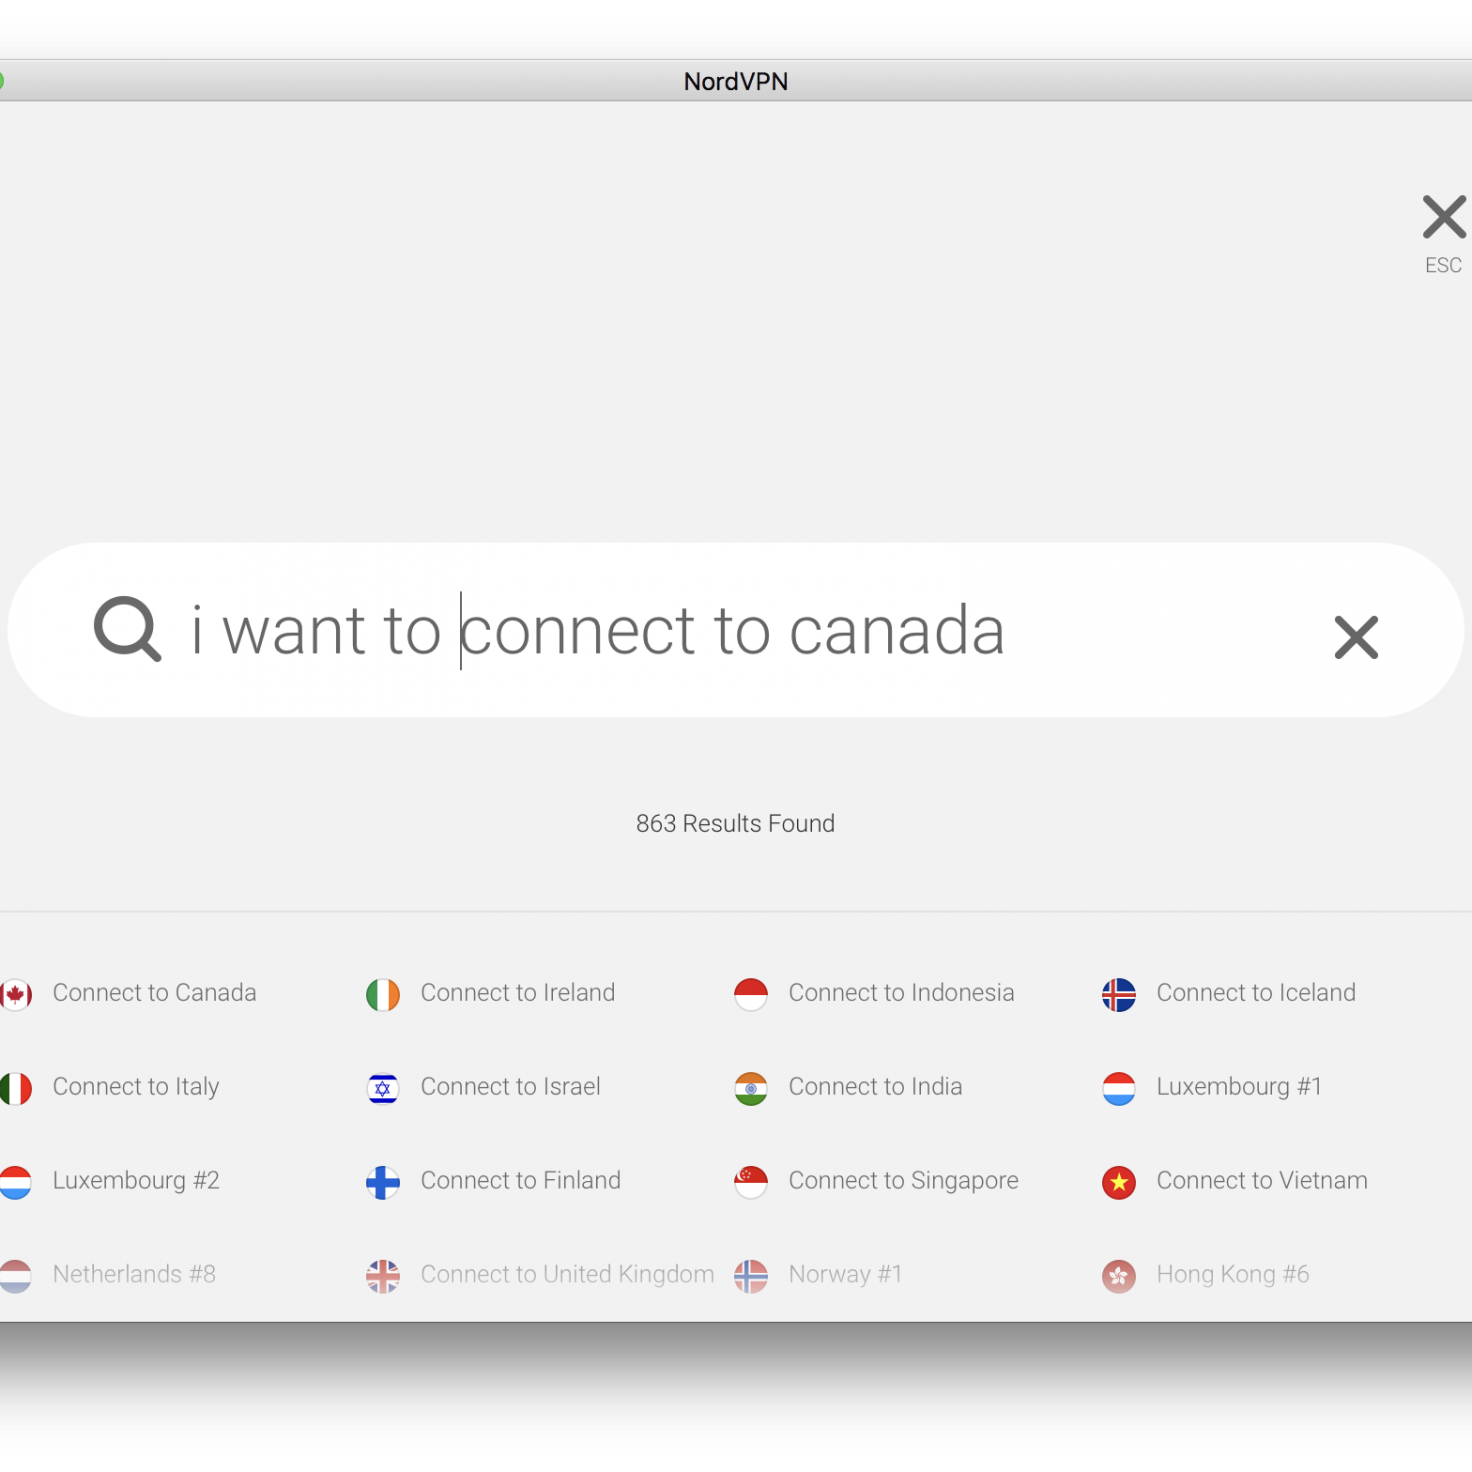
If you click on the search icon, you’ll be presented with a search box and some recommended searches based on popular settings people use with NordVPN. For example, you can type, I want to use P2P and all the NordVPN servers in P2P friendly locations will appear, allowing you to easily select one to connect to. Or, let’s say you are in the U.S. (like me) and wanted to connect to a VPN server in Canada, you can simply type I want to connect to Canada and you’ll be presented with a more generic “Connect to Canada” option which will automatically select and connect you to a Canadian VPN server.
 Most of the time you will want a close server
For most web browsing, watching Netflix, etc you will want to make sure you pick a server that’s close to you geographically. You can easily go to the home screen of NordVPN (as shown above) and scroll down on the left-hand menu bar until you see “Server List,” click on that and a window will popup with all of the servers in the NordVPN network. You can search for a particular server location or even filter the servers by type (P2P, Double VPN, Anti-DDoS, etc). Since I’m in the U.S. I looked through all the U.S. based servers until I found a handful there were very close to me. Once you find the ones which are close by you can favorite them (by clicking the heart icon) making them easy to find and reconnect to later on.
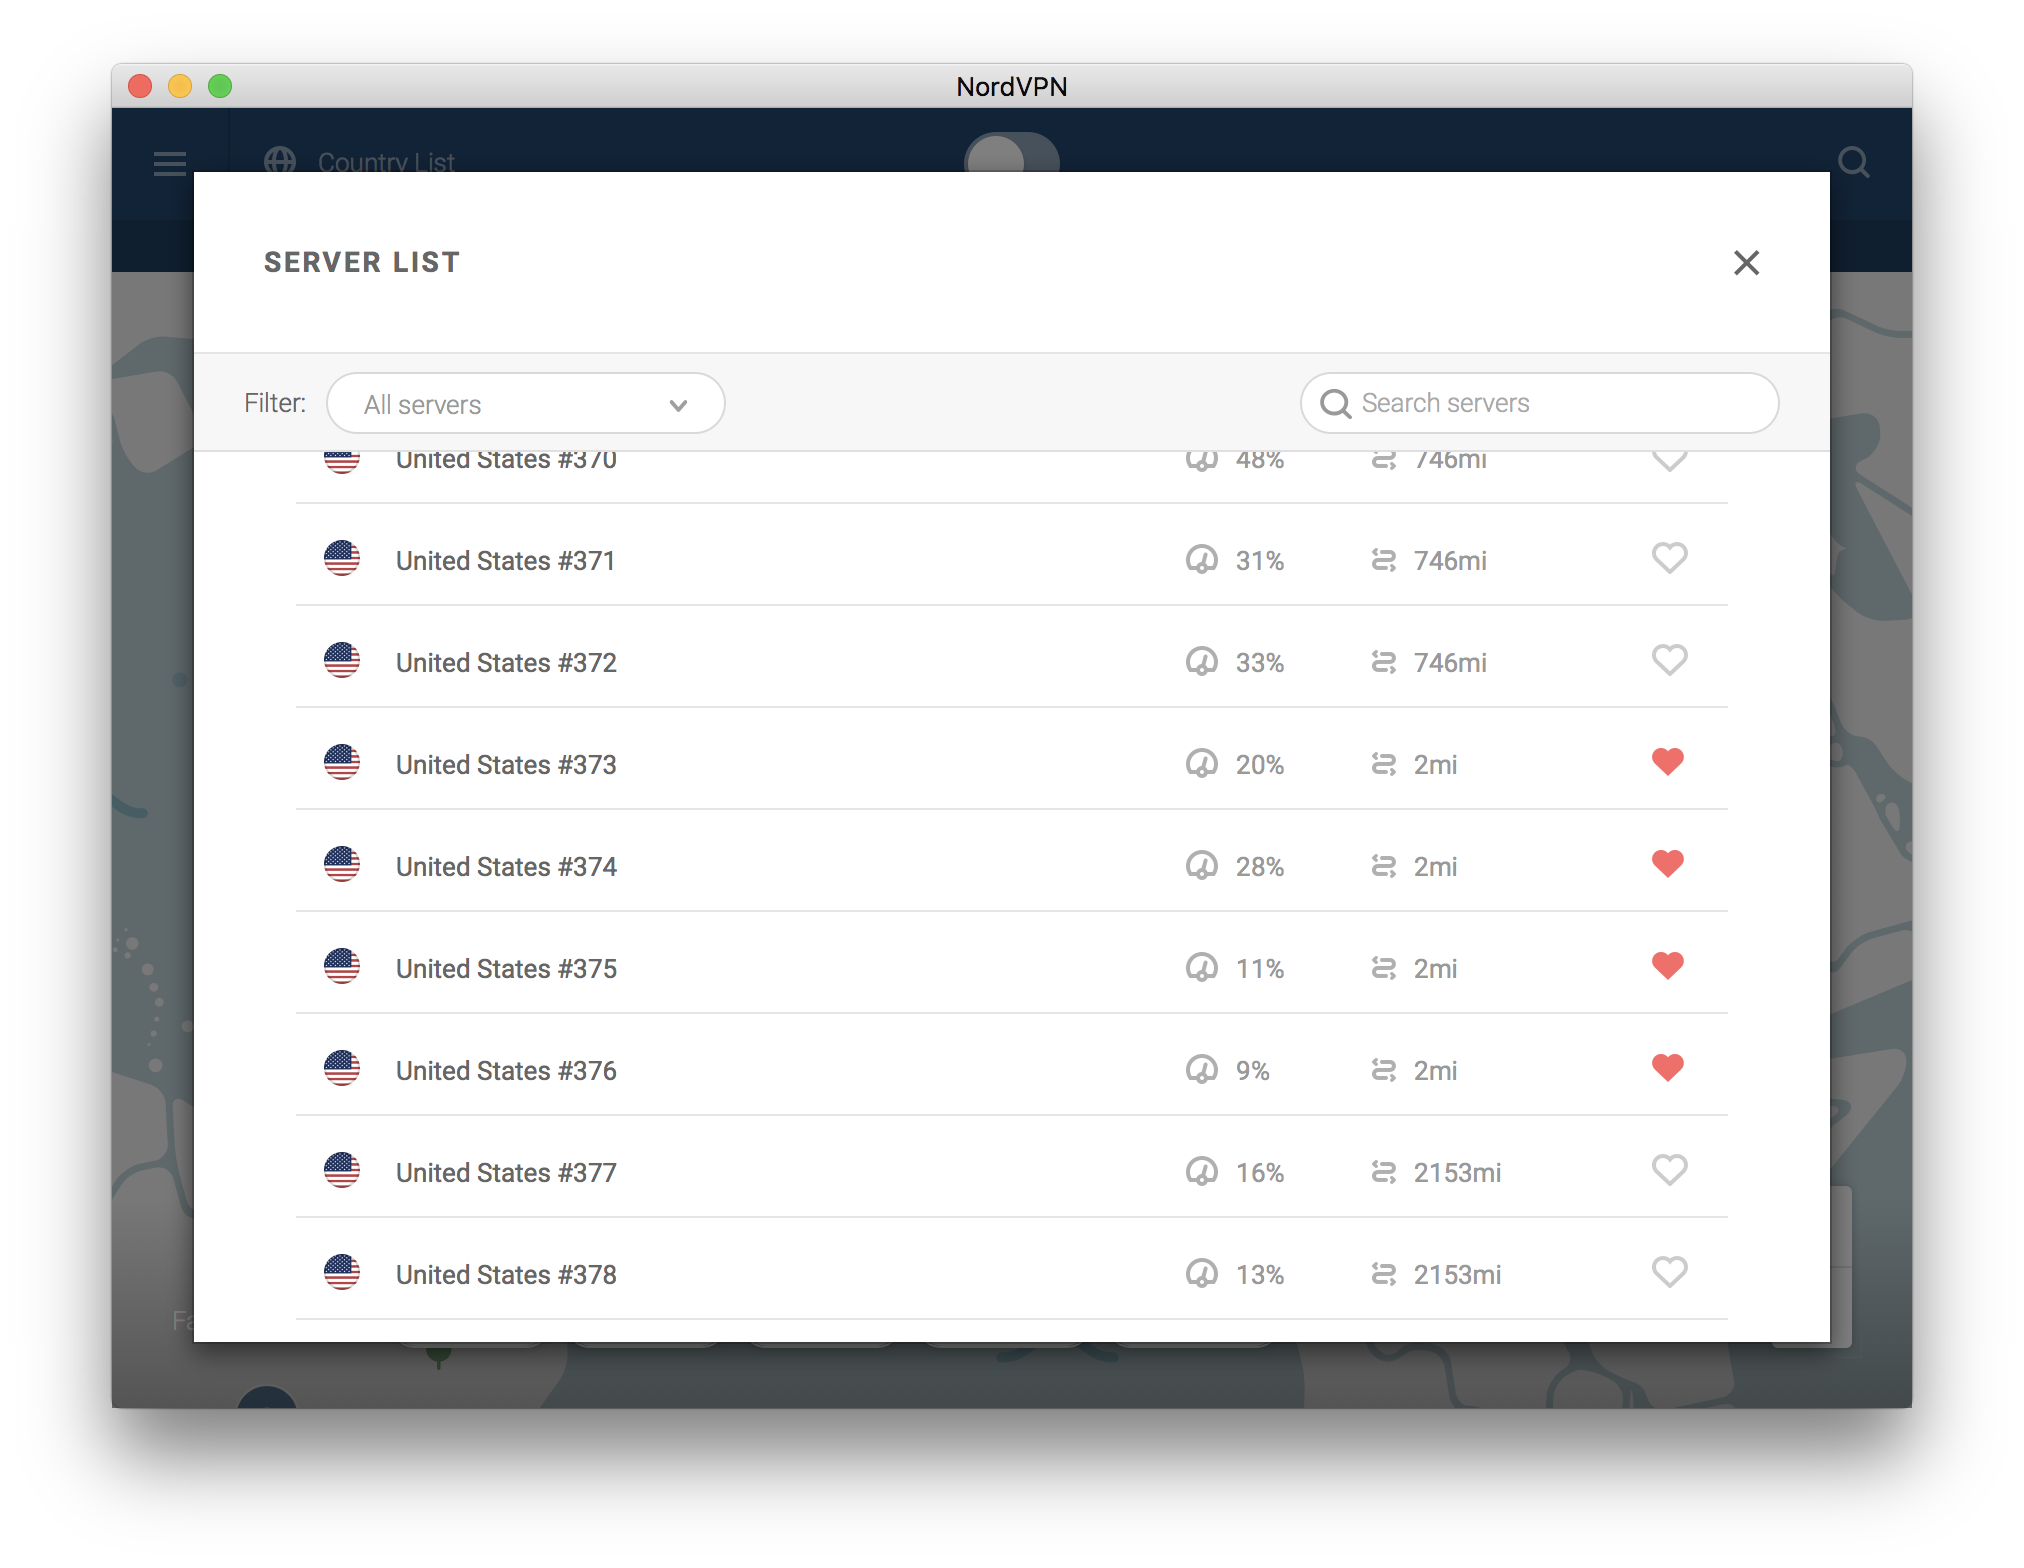 Before you pick the server you’ll be connecting to, you may want to make note of that servers current load in addition to the distance it is from you. The higher the load on the server, the more latency that may occur. It’s always best to pick the lowest load and closest distance you can find.
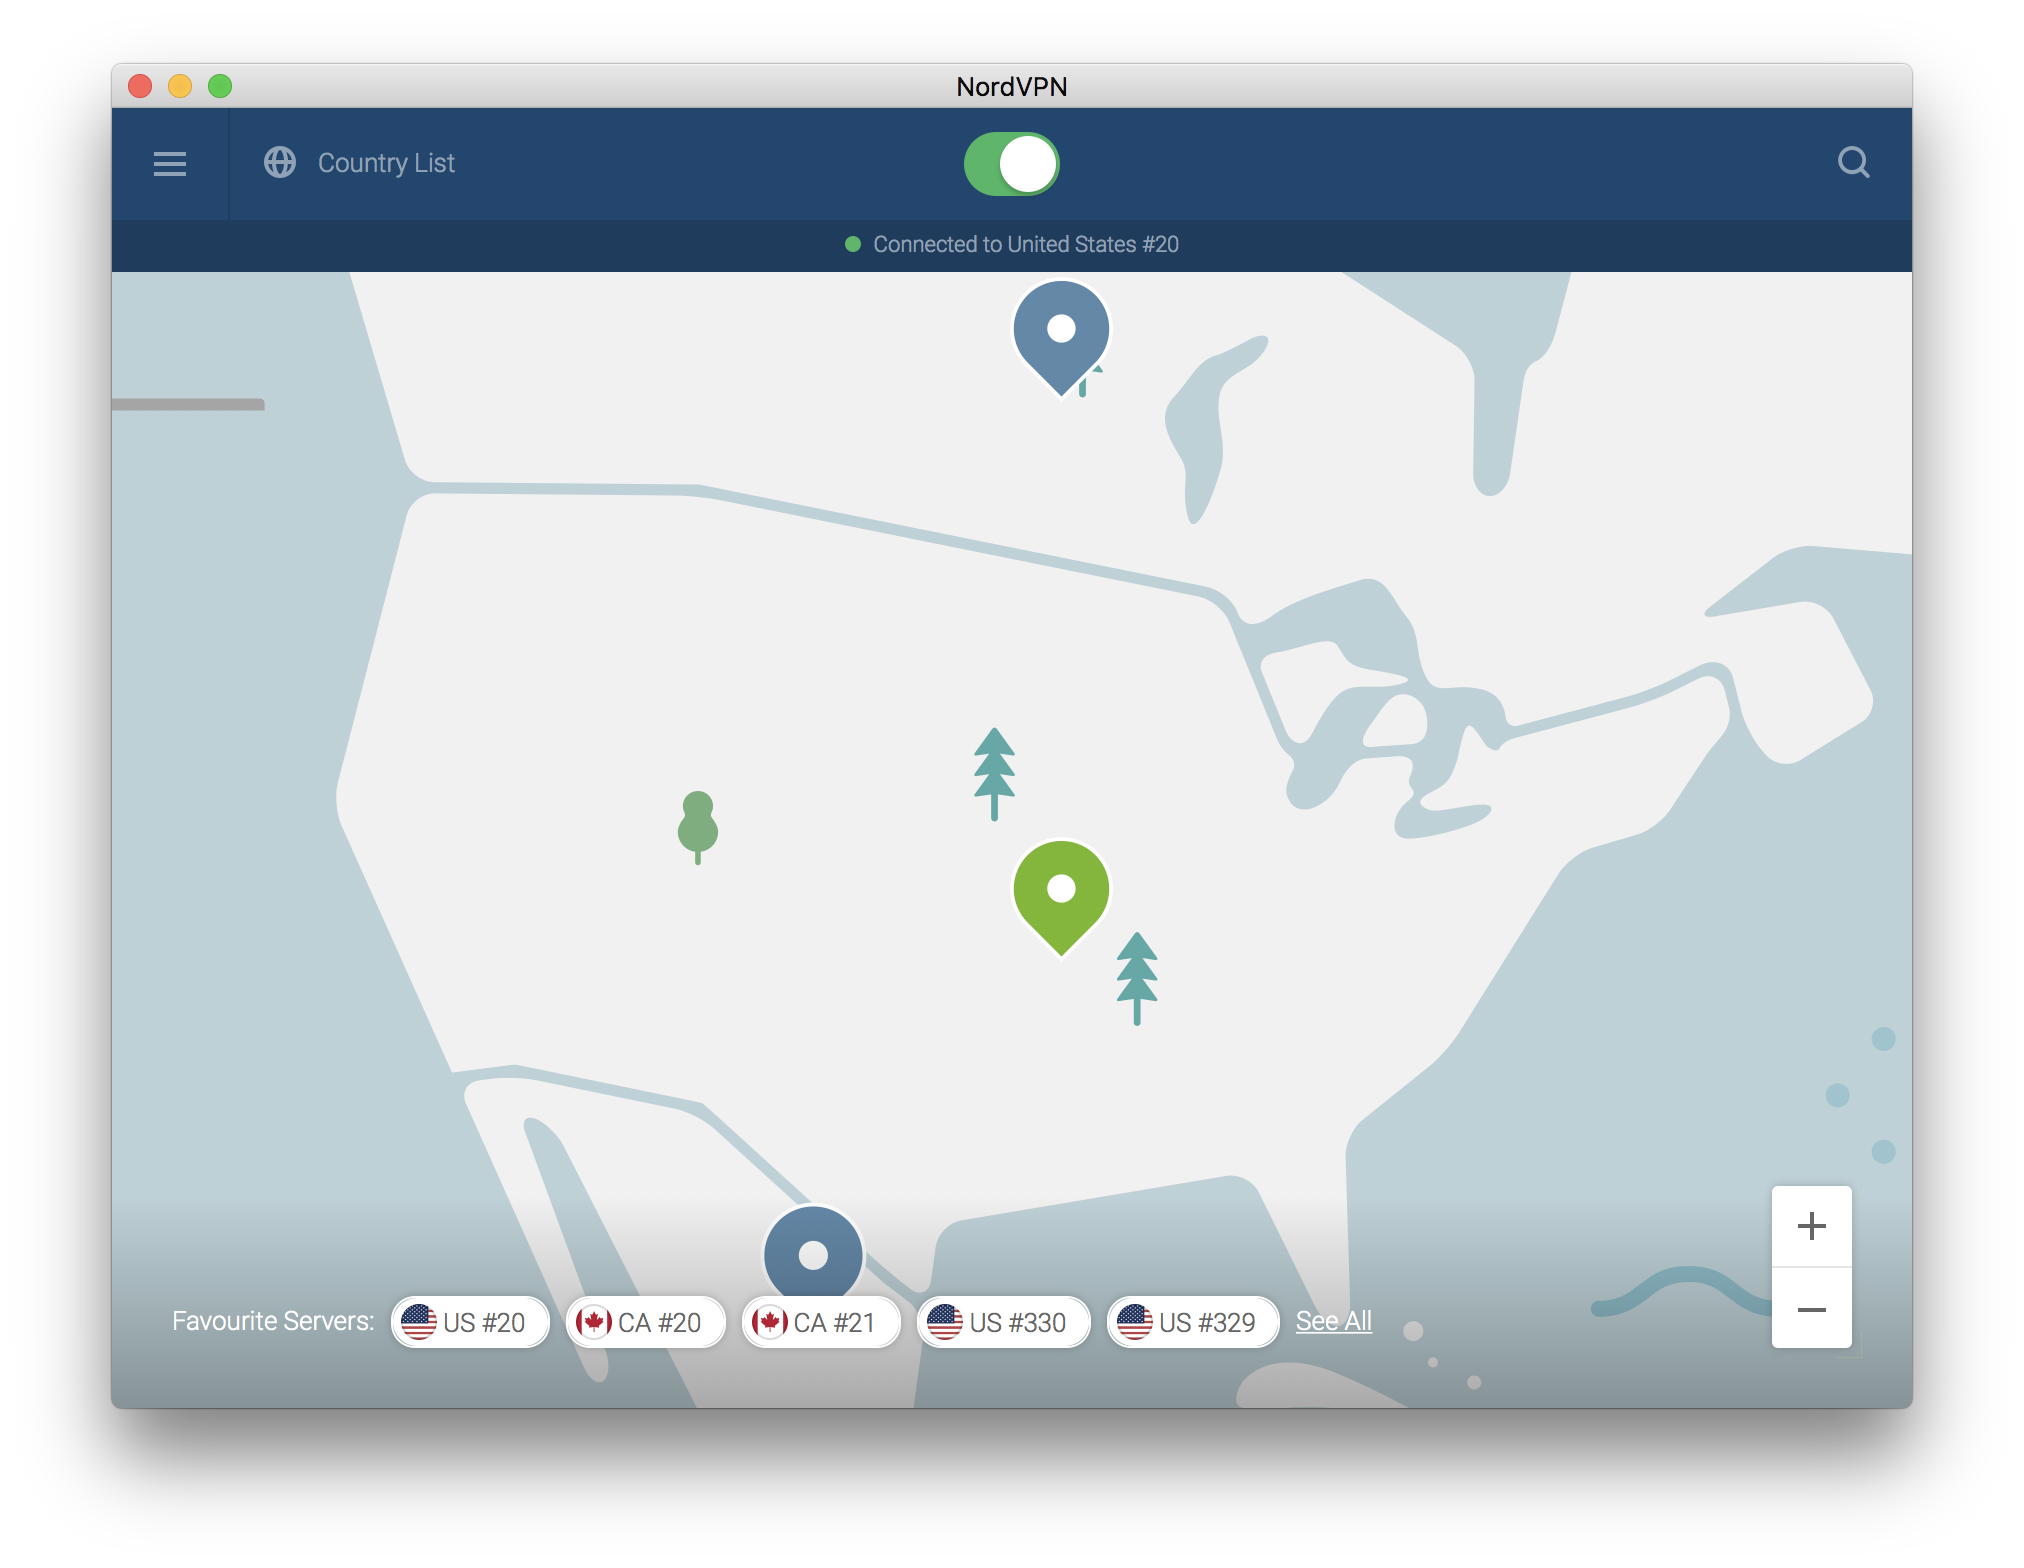
Now that you have your VPN server picked, click to connect to it. And when successfully connected the NordVPN home screen will look something like this. You may lose your internet connection briefly while your computer connects to the VPN server–that’s normal and to be expected, it will come back once you are successfully connected.
That’s it, you have now setup NordVPN on your computer and are browsing safer and with much more privacy. Additionally, with this special deal, you can get 68% off and 3 months free of NordVPN.