How To Set Up AMP for WordPress

Recently, Google unveiled their Accelerated Mobile Pages project (also known as AMP). The open source project aims to make the mobile web faster by creating a less-flashy, less-cluttered way to view content on your phone. The idea, as with many open source projects, is to create a vibrant and healthy community around AMP which will allow Google to compete against alternative (more closed) solutions such as Apple News and Facebook’s Instant Articles.
What’s really great is that Google is already pushing ahead with AMP at full speed. In fact, as of late last week Google announced it would begin to send mobile traffic from Google search to AMP-enabled articles starting in February 2016.
By the way, if you’re curious what an AMP-Enabled search looks like, click here to search Google for “mars” (this will only work on your mobile device).
So if you want to be ready come February 2016, you need to follow my guide below on how to set up AMP on your WordPress install. But before we get to that, let’s discuss AMP in a bit more detail.
Why AMP Is Important
As the growth in mobile usage continues to climb (and it will) websites need to be able to be super fast and responsive (I don’t mean design wise). Even today, with mobile exploding, many websites still run slowly on phones. This is because the majority of websites out there aren’t optimized for mobile. Things such as larger graphics, complex scripts, and even ads are meant for a rich user experience on a desktop and can make the same pages feel sluggish on a phone. And that’s where AMP comes into play.
One of the goals of Accelerated Mobile Pages (AMP) is to improve the speed and user experience for content. These are important things to care about. Why did web apps fail and native apps succeed? Speed and user experience in native apps blew away that of web apps. If you think about it, most of the time spent on a smartphone is within apps — not so much the mobile web (likely because it’s slow and clunky). If Google can change that it’ll be a huge win for them (and publishers). But anyway, that topic could be a whole separate blog post — back to the show.
Why AMP Is Different Than Responsive
AMP is hoping to achieve this promised speed increase by limiting the tools a developer can use to display content. AMP guidelines include:
- no form fields
- no external javascript
- no external stylesheets
- no inline styles
- everything must adhere to limits for file size
How To Set Up AMP on WordPress
By the easiest, best, and fastest way to get AMP working on WordPress is by using the AMP for WordPress plugin created by the fine folks at Automattic (creators of WordPress).
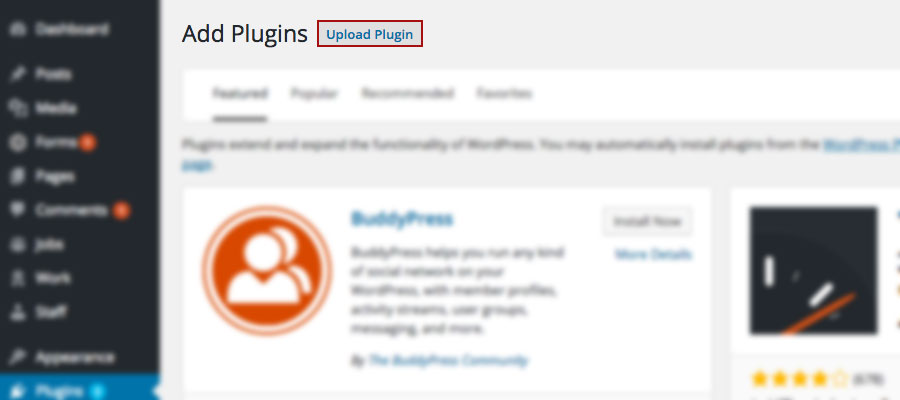
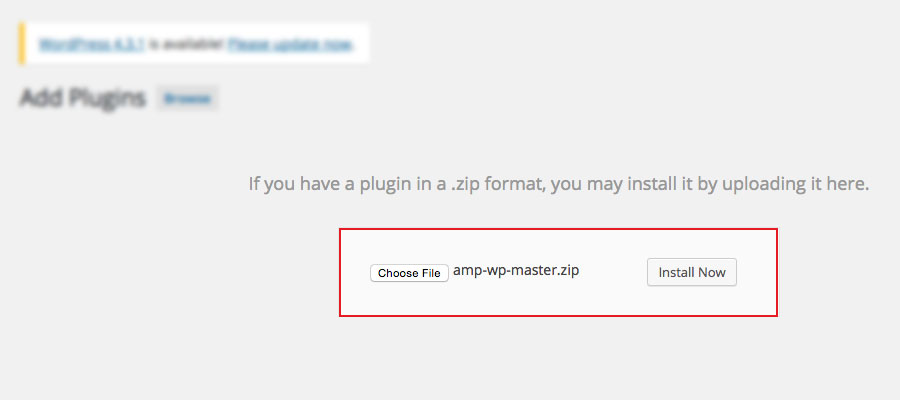
Note: The plugin is listed in the WordPress plugin repository but for some reason that one didn’t work correctly for me. I found downloading the latest version from the plugins Github repository to work best so that’s how I’m going to layout my instructions.
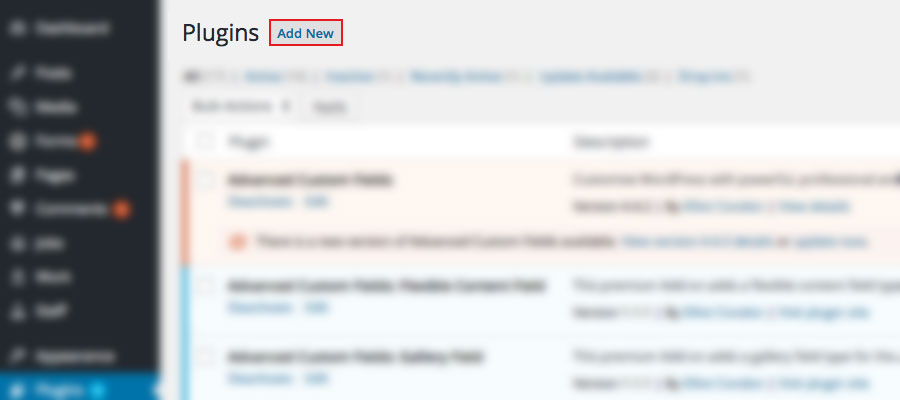
- Download the official AMP for WordPress plugin. Save the file on your computer somewhere you can find it.
- Upload, install, and activate the AMP for WordPress plugin from your WordPress admin panel.
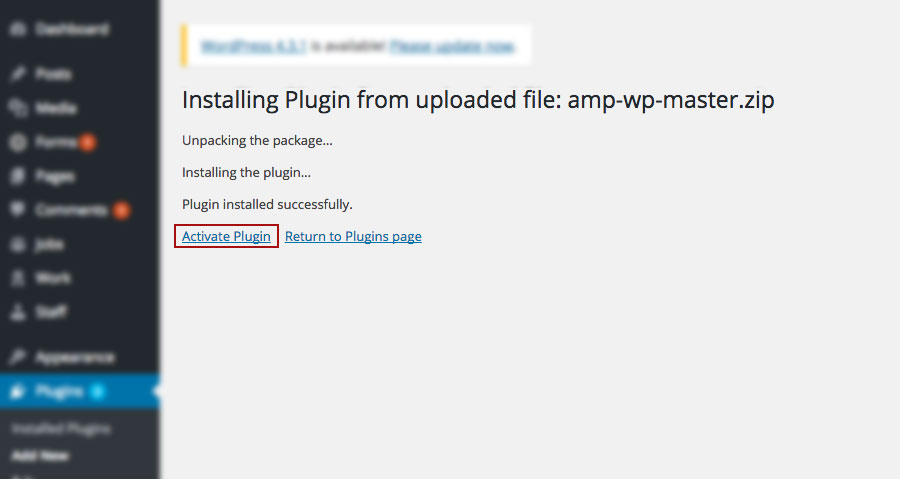
Whew! The hard part is over. Now let’s make sure it’s working properly.
Here’s How You Test AMP on WordPress
Open your website and load any post page. Once the page is loaded you will need to take a look at the source code of the page. In most browsers you can right click on the page somewhere and click View source. I use Google Chrome so if you’re like me, I would right click anywhere on the page and click Inspect (alternatively you can click View Page Source). Now what are we looking for? Well, find the <head> section of the page and look for the link that is directing crawlers to your “amphtml” version of the page.

Notice the trailing “/amp/” on the URL? Click that. It will load your brand new AMP-enabled page in your browser. You can append /amp/ to any post URL and it will load the AMP-enabled version of the page. For example, https://www.besttechie.com/nautilus-startup-accelerator/ would become https://www.besttechie.com/nautilus-startup-accelerator/amp/.
The plugin provides a generic theme template which you can modify to your liking (as I did–see screenshot).

In order to edit the template for your AMP-enabled pages you will need to open the template.php file located in the amp-wp-master folder within the WordPress plugins directory. Pretty much everything you would likely want to touch/edit will be in that single file. Before you go and edit it though I would recommend reading over the HTML documentation for AMP.
After you edit the template file, save it, and re-upload it your server. The changes should take effect immediately (unless you have some kind of caching plugin, if so, clear the cache for the changes to propagate quicker).
Questions, comments, hate mail? Leave it below in the comments!